Pressure Canning
ID
348-585 (FST-222)
 EXPERT REVIEWED
Introduction
The process for canning foods in the home depends on the acidity of the food, which is determined by its pH. Low-acid foods have a pH more than 4.6, and high-acid foods have a pH less than 4.6. In general, vegetables and meats are low-acid foods, and fruits are high-acid foods. High-acid foods can be safely processed in a boiling water bath, but low-acid foods must be processed in a pressure canner.
This publication will outline how to safely preserve low-acid foods through pressure canning at home. For information on safe home preservation of high-acid foods, see “Boiling Water Bath Canning,” Virginia Cooperative Extension (VCE) publication 348-594.
Background Information
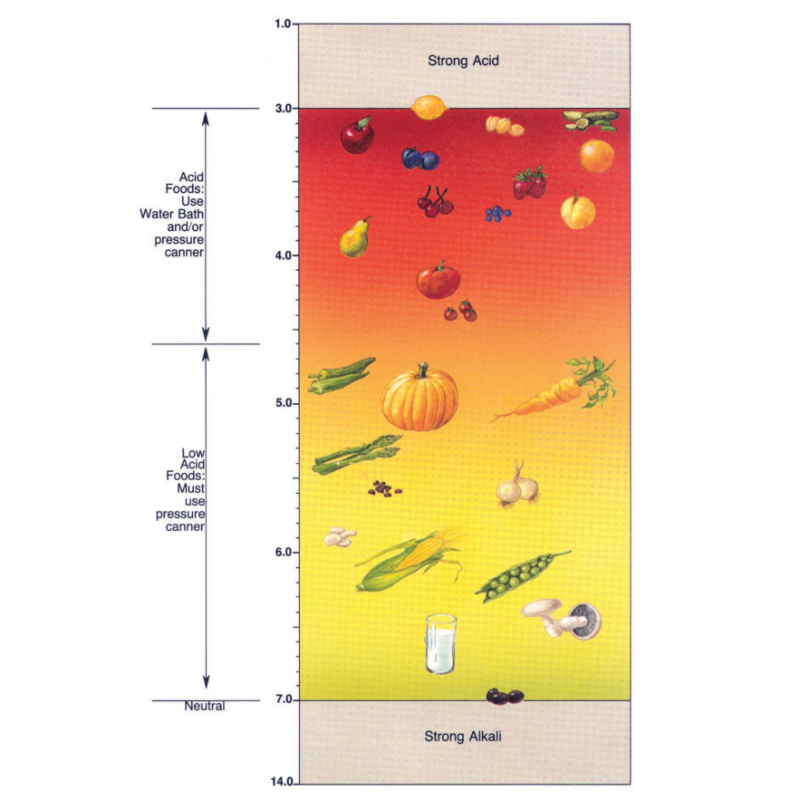
Pressure canning is the only safe method for processing low-acid foods such as vegetables, meat, poultry, and fish. Figure 1 and the lists below provide some examples of low-acid and high-acid foods.
| Low-acid foods* |
|---|
| Asparagus Bean Beets Carrots Corn Hominy Meat Mushrooms Okra Peas Potatoes Seafood Spinach Squash (winter)* |
* Canning not recommended for summer squash.
| High-acid foods |
|---|
| Apples Applesauce Apricots Berries Cherries Cranberries Fruit juices Oranges Peaches Pears Pickled beets Pineapple Plums Rhubarb |
The pH of low-acid foods is too high to prevent the growth of Clostridium botulinum, the microorganism responsible for the deadly illness botulism. When placed in an environment with no oxygen (common in canned foods), C. botulinum spores are able to grow and produce the botulism toxin. The spores of C. botulinum are not affected by boiling water temperatures (212 degrees Fahrenheit (F), 100 degrees Celsius (C)).![]()
The only way to kill these spores is under pressure. When processed under pressure, the temperature of the food can be increased to 240 F. When processed for an appropriate amount of time (depending on the food, style of pack, amount of pressure, and size of the jar), this high-temperature treatment is sufficient to eliminate C. botulinum spores from low-acid canned foods.
Equipment Requirements
Pressure Canner
Pressure canners are metal containers designed to trap steam. They are typically made of aluminum or stainless steel materials strong enough to withstand the pressure that builds up during processing. Depending on the style and age of your pressure canner, you can expect it to have the features shown in figure 2.
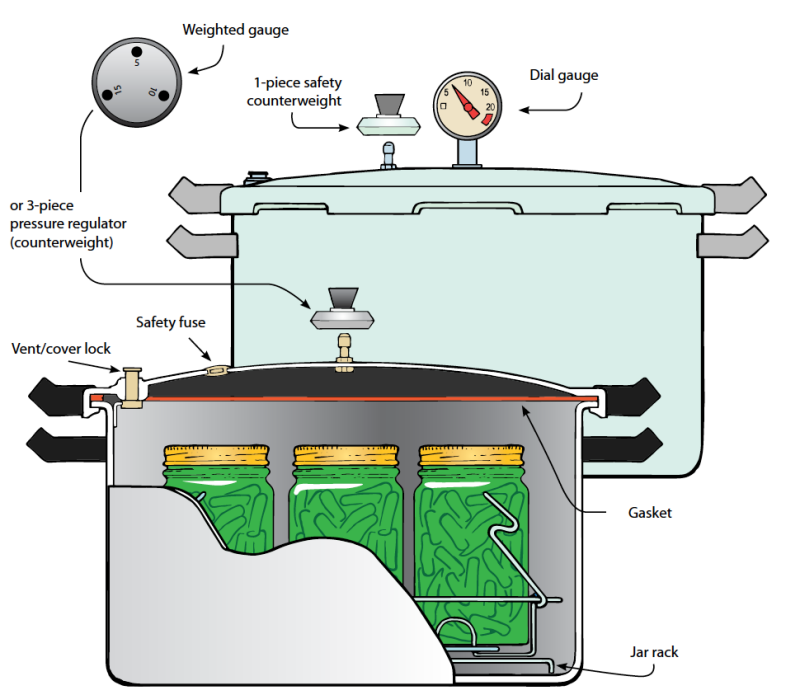
The vent port (steam port or petcock) is a short, hollow pipe that extends from the interior of the container above the lid. It allows air and steam to escape when it’s open and traps air and steam inside when closed. The steam vent will have either a weighted gauge or a dial gauge to indicate the amount of internal pressure inside the canner during processing.
Dial gauges measure the amount of pressure using a needle that points to a dial. Check the accuracy of dial gauges yearly. If your gauge is off by more than 2 pounds of pressure, replace it. If a product is under-processed because your dial reads too high, spoilage or foodborne illness can result. If overprocessing occurs because the dial reads too low, the quality of your home-canned products may suffer but there will be no risk of foodborne illness.
Weighted-gauge pressure canners consist of small weights, or discs, that are placed over the vent port. The primary advantage of the weighted gauge is that it can be used to control the internal pressure. The most common type is the three-piece gauge, which consists of three separate pieces. The addition of each weight or disc corresponds to 5 pounds of pressure. When the correct pressure has been reached and maintained, the weights will rock or jiggle, creating a characteristic sound. The one disadvantage of the weighted gauge is that you cannot correct precisely for altitude changes.
Pressure canners are also designed with a safety fuse or valve. This is a thin metal insert or rubber plug designed to release pressure if the temperature or pressure becomes dangerously high.
Sealing devices, such as gaskets or sealing rings, form a tight seal between the canner base and the lid. Clamping rings on the lid are used to fasten the lid tightly onto the canner.
Canners also have a metal jar rack that elevates filled jars above the bottom of the canner. This prevents breakage and allows steam to circulate during processing.
Follow the manufacturer’s directions for proper care and cleaning of your specific style and model of canner. For safe operation, the vent, safety valve, and edges of the lid and canner must be clean at all times. Clean the vent using a string or a narrow strip of cloth. Wash and dry the canner before and after each use but do not immerse the dial gauge if your model has one. Store with crumpled newspapers tucked into the bottom and around the jar rack to absorb moisture and odors. Place the lid upside down in the canner but do not seal the lid.
Jars and Lids
Only glass jars that have been tempered (strengthened) for heat and cold should be used in home canning. The mason-type jar is the most commonly used. Mayonnaise jars and jars from commercial foods should not be used. Jars should be free of chips or nicks because these could cause breakage during the heating process or prevent sealing. Jars can be purchased in various sizes, ranging from one-half pint to a gallon. Most recipes have been designed to accommodate pint- and quart-size containers. Undamaged jars may be used indefinitely.
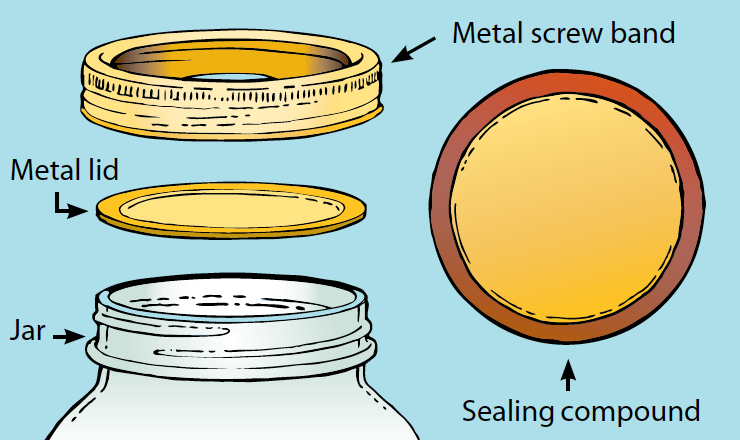
The two-piece lid, consisting of a flat disc with sealing compound around the outer edge and a separate metal screwband, is the most common type of lid available (figure 3). Lids should only be used once, but screwbands may be reused. However, lids that are more than 5 years old, dented, deformed, flawed, or were previously used in the sealing of a commercial product should not be used. Follow the manufacturer’s instructions for use to ensure a good seal during processing.
Optional Utensils
Along with clean towels, hot pads, and cutting boards, there are a number of items that can be useful for home canning:
Jar funnel – to pour food product into jars.
Jar lifter – snuggly and safely grips hot jars for removal from canner.
Bubble freer – a plastic spatula or utensil used to work bubbles out of jars.
Lid wand – magnetic wand used to place hot boiled lids onto freshly filled jars.
Timer – to track processing time.
Selecting and Preparing Low-Acid Foods for Pressure Canning
Some people choose to pressure-can fruits, although it is not necessary for the safety of the product because fruits are high-acid foods. Pressure canning will actually make the overall processing time longer because of the time needed to build up the required amount of pressure. For more information on how to prepare fruits for the canning process, see “Boiling Water Bath Canning,” VCE publication 348-594.
The type of preparation involved will depend on the specific food product you are canning. Below are some general considerations for preparing low-acid foods for home canning; more specific information can be found within individual recipes.
Meat, Poultry, and Game
Use only good-quality, disease-free meat, poultry, or game. Rinse poultry and keep all meats and game clean and sanitary. Chill to less than 40˚ F directly after slaughter. If canning will not take place within one to two days, freeze it. Remove all fat and gristle, because during canning it will float to the top, potentially affecting the seal.
Vegetables
In general, select vegetables that are firm and ripe, but not overripe. For the best results, keep the time between harvesting and canning as short as possible. Wash and rinse with water, but do not allow them to soak because nutrients may be lost. Continue to wash until rinse water is clear. Peel vegetables if necessary, remove seeds, etc., and trim away bruised areas. Cut into serving sizes.
Tomatoes and Tomato Products
Tomatoes are near the dividing line for classification as a high-acid food. Most varieties — grown under normal conditions and harvested at optimum ripeness — can be treated as high-acid foods that can be processed in a boiling water bath. However, a number of factors can change the acidity, including weather extremes (moisture and heat), condition of the vines (killed by disease or frost), and ripeness. Tomato variety can also affect the acidity. For example, many popular heirloom tomatoes are lower acidity than newer cultivars.
The home food preserver cannot determine the pH of a batch of tomatoes by visual inspection, so it is recommended that either lemon juice or citric acid be added directly to each jar of tomatoes processed in a water bath canner. Tomatoes can be acidified by adding 1 tablespoon of bottled lemon juice or ¼ teaspoon of citric acid per pint. Add sugar to offset the acid taste, if desired. Four tablespoons of vinegar per quart or 2 tablespoons per pint can also be used but may also result in undesirable flavor changes. Specific recommendations for tomato products can be found in Table 2.
Tomato-based products, such as some salsas and meat spaghetti sauce, cannot be processed in a boiling water bath canner because so many low-acid ingredients like peppers and meat have been added to them. Such products can only safely be processed using a pressure canner. Make sure to follow a tested recipe from a reputable source. Reputable sources include; the National Center for Home Food Preservation, and the USDA “Complete Guide to Home Canning” or your local county Extension agent.
Preparation of Equipment and Supplies for Pressure Canning
Preheating the Pressure Canner
Fill the pressure canner with 2 to 3 inches of clean water. There is no need to heat the water at this time. Keep an extra kettle of water heating in case additional boiling water is needed to maintain 2 to 3 inches of water after the jars have been added.
Preparing Jars and Lids
Discard canning jars with nicks or cracks; damage may prevent an airtight seal from forming. Wash jars in the dishwasher or using soapy water, followed by a rinse in hot water. Keep the jars hot until you use them. This will prevent breakage when jars are filled and placed into the canner.
Use new canning lids for each jar. Prior to use, examine all lids for dents, gaps, or defects in the sealing gasket. Prepare lids according to manufacturer’s directions. Most will need to be brought to a simmer and then left in hot water until use (figure 4).

Packing Jars
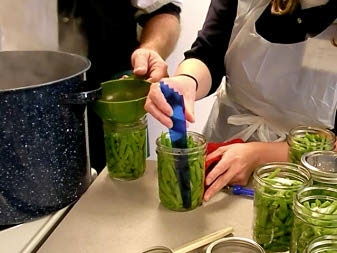
Foods may be packed into jars while raw or hot. Raw-packing means adding uncooked food directly to the jar, then pouring boiling water over the product (figure 5). Raw food is packed tightly in most cases because there is shrinkage that occurs after the product cools.
Hot-packing involves heating the product to boiling or cooking the product for a specified amount of time, packing it into jars, and filling the jars with boiling hot liquid. Hot-packed foods are packed loosely because food shrinks during the cooking process before it reaches the jar. Hot-packing yields better color and flavor compared to raw-packing.

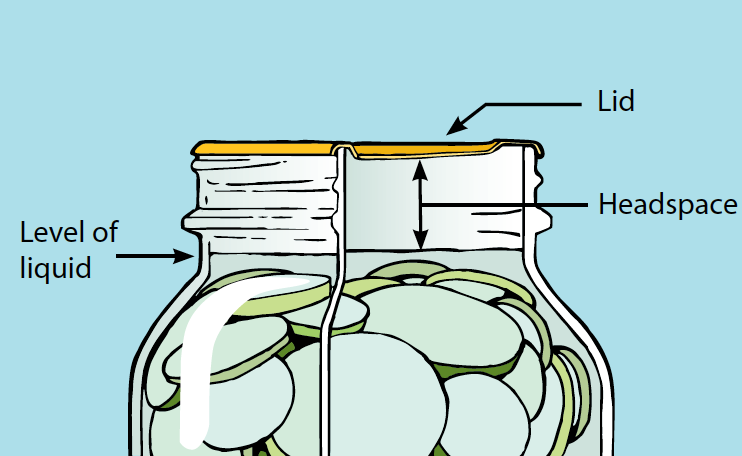
Headspace
Regardless of the type of packing process that is used, all products require that a specific amount of headspace be left after filling (figures 6 and 7). Headspace is the distance between the top of the jar and the top of the food. Foods that swell require more headspace when filling. If too little headspace is left, food may boil up and out of the jar, preventing a seal. If too much headspace is left, the processing time may be inadequate to drive off the oxygen within the jar, preventing the seal from forming. Recipes will specify the amount of headspace that should be left for each specific product.

Closing the Jars
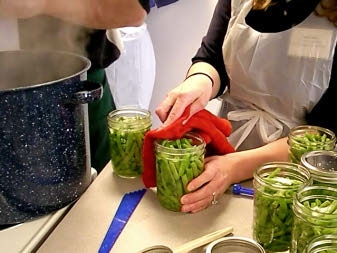
Air bubbles that remain in the product will rise during boiling, potentially affecting the amount of air space within the jar during processing. Remove air bubbles using a plastic spatula or utensil (figure 8). Do not use metal because it may scratch the glass, which could weaken the jar and cause breakage during processing. Gently poke the spatula into the jar, allowing air to escape throughout the product.
| Vegetable | Packing Conditions Style of Pack |
Packing Conditions Jar Size |
Weighted gauge (10 pounds pressure) Dial gauge (11 pounds pressure) |
|---|---|---|---|
| Asparagus | Hot & Raw | Pints | 30 |
| Asparagus | Hot & Raw |
Quarts | 40 |
| Beans (green) | Hot & Raw | Pints | 20 |
| Beans (green) | Hot & Raw | Quarts | 25 |
| Beans (lima, pinto, butter or soy) | Hot & Raw | Pints | 40 |
| Beans (lima, pinto, butter or soy) | Hot & Raw | Quarts | 50 |
| Beets | Hot | Pints | 30 |
| Beets | Hot | Quarts | 35 |
| Carrots | Hot & Raw | Pints | 25 |
| Carrots | Hot & Raw | Quarts | 30 |
| Corn, whole-kernel | Hot & Raw | Pints | 55 |
| Corn, whole-kernel | Hot & Raw | Quarts | 85 |
| Greens | Hot | Pints | 70 |
| Greens | Hot | Quarts | 90 |
| Okra | Hot | Pints | 25 |
| Okra | Hot | Quarts | 40 |
| Peas, Green or English | Hot & Raw | Pints | 40 |
| Peas, Green or English |
Hot & Raw | Quarts | 40 |
| Potatoes, white | Hot | Pints | 35 |
| Potatoes, white | Hot | Quarts | 40 |
| Meat Strips, Cubes, or Chunks | Hot or Raw | Pints | 75 |
| Meat Strips, Cubes, or Chunks | Hot or Raw | Quarts | 90 |
| Ground or Chopped Meat | Hot or Raw | Pints | 75 |
| Ground or Chopped Meat | Hot or Raw | Quarts | 90 |
| Poultry, without bones | Hot or Raw | Pints | 75 |
| Poultry, without bones | Hot or Raw | Quarts | 90 |
| Poultry, with bones | Hot or Raw | Pints | 65 |
| Poultry, with bones | Hot or Raw | Quarts | 75 |
For processing times and methods for additional low-acid foods, please refer to the national Center for Home Food Preservation (http://www. uga.edu/nchfp/): or your local county extension agent.
| Tomato type | Packing Conditions Style of Pack |
Packing Conditions Jar Size |
Pounds Pressure (PSI) 6 lb |
Pounds Pressure (PSI) 11 lb |
|---|---|---|---|---|
| Tomato Juice | Hot | Pints or quarts | 20 | 15 |
| Tomatoes (whole or halved), packed in water | Hot or Raw | Pints or Quarts | 15 | 10 |
| Tomatoes, (whole or halved), packed in juice | Hot or Raw | Pints or Quarts | 40 | 25 |
| Tomatoes, crushed with no extra liquid | Hot | Pints or Quarts | 20 | 15 |
| Tomatoes, (whole or halved), no extra liquid | Raw | Pints or Quarts | 40 | 25 |
| Tomato type | Packing Conditions | Packing Conditions Jar Size |
Pounds Pressure (PSI) 5 lb |
Pounds Pressure (PSI) 10 lb |
Pounds Pressure (PSI) 15 lb |
|---|---|---|---|---|---|
| Tomato Juice | Hot | Pints or quarts | 20 | 15 | 10 |
| Tomatoes (whole or halved), packed in water | Hot or Raw | Pints or Quarts | 15 | 10 | 1 |
| Tomatoes, (whole or halved), packed in juice | Hot or Raw | Pints or Quarts | 40 | 25 | 15 |
| Tomatoes, crushed with no extra liquid | Hot | Pints or Quarts | 20 | 15 | 10 |
| Tomatoes, (whole or halved), no extra liquid | Raw | Pints or Quarts | 40 | 25 | 15 |
For processing times and methods for additional low-acid foods, please refer to the national Center for Home Food Preservation (http://www. uga.edu/nchfp/): or your local county extension agent.
Wipe the rim of the jar with a clean, damp cloth, removing all debris and liquid (figure 9). Center the metal lid with the sealing compound onto the jar and lightly screw the metal screwband into place. Do not overtighten, or air will not be able to escape during the canning process. This can result in buckled lids and cans that do not seal.
Selecting the Correct Processing Time
Processing times and recipes should be obtained from approved sources, such as the National Center for Home Food Preservation website, “So Easy to Preserve” (White et al. 2006) from University of Georgia Cooperative Extension, or the “USDA Complete Guide to Home Canning” (2009). These sources provide scientifically developed processing times designed for specific food products under specific conditions and should be followed exactly as stated. If a recipe is not available for your product, do not attempt to preserve it by pressure canning.
Pressure canning allows food to be processed at temperatures higher than boiling (212 F). Food is heated to 240 F using 10 or 11 pounds of pressure and processed for the amount of time that is required to destroy all dangerous microorganisms and C. botulinum spores. Processing conditions will depend on a number of factors: the density of the food product, packing liquid, pH, jar size, and altitude. Table 1 provides the processing conditions for a select number of low-acid foods.
Effect of Altitude
Processing times provided in canning tables are for altitudes from zero to 1,000 feet above sea level. From sea level to an altitude of 2,000 feet, dial-gauge pressure canners are operated at 11 pounds of pressure. At altitudes up to 1,000 feet, weighted gauges are operated at 10 pounds of pressure. At altitudes above 1,000 feet, weighted-gauge canners need to be operated at 15 pounds of pressure. See table 2 for altitude adjustments.
| Altitude (feet) | Weighted gauge | Dial gauge |
|---|---|---|
| 0-1,000 | 10 | 11 |
| 1,001-2,000 | 15 | 11 |
| 2,001-4,000 | 15 | 12 |
| 4,001-6,000 | 15 | 13 |
| 6,001-8,000 | 15 | 14 |
| 8,001-10,000 | 15 | 15 |
General Pressure Canner Processing Steps
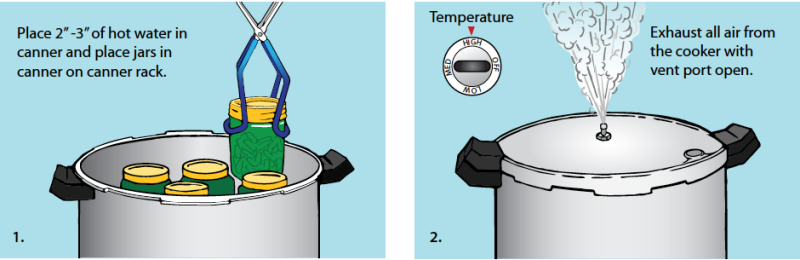
After the jars are packed and closed and the proper processing time has been selected, process as follows (also outlined in figure 10 on page 8):
- Fill the pressure canner with 2 to 3 inches of clean water. Heat an extra kettle of water on the stove in case additional boiling water is needed. For hot-packed foods, you can bring the water up to 180 F.
- Place the sealed jars on the rack in the canner. Leave space around the jars so that steam can circulate during processing. Keep the jars upright at all times; tilting may allow food to seep into the sealing area, preventing the seal from forming.
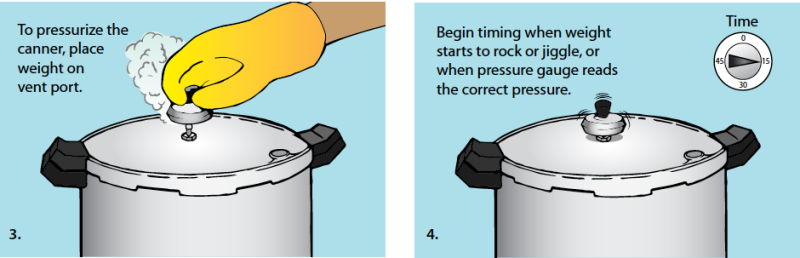
Fasten the canner lid. Leave the weight off of the vent port or open the petcock, depending on your style of canner.
Turn the heat setting to its highest position. Heat until the water boils and steam flows from the open vent or petcock in a funnel shape. Allow the steam to vent or exhaust for 10 minutes. If this step is skipped, pressure will not adequately build up in canner resulting in improper processed product.
After venting, place the counter weight or weighted gauge on the vent port or close the petcock if you have a dial-gauge canner. The canner will now begin to pressurize.
For dial-gauge canners, allow the pressure to quickly rise to 8 pounds of pressure. At this point, turn the temperature down and let the pressure rise slowly to the correct setting. When using a weighted-gauge canner, allow the canner to heat quickly until steam begins to escape from the gauge or the gauge begins to jiggle and rock. Reduce the heat slightly when the weighted gauge begins to make noise, as described by the manufacturer.
Begin timing when the dial reads the correct pressure or the weighted gauge begins to jiggle or rock.
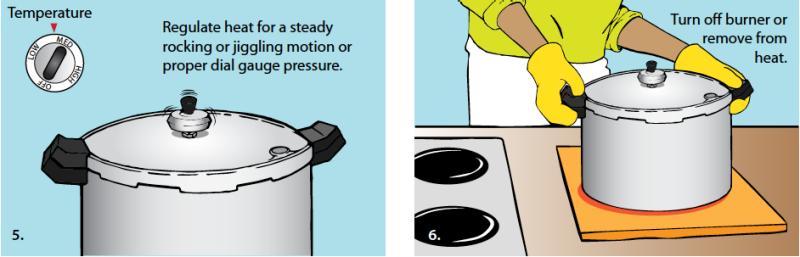
Adjust the heat in order to maintain a steady pressure at or above the recommended level.
After the timed process is complete, remove the canner from the heat and allow the canner to cool naturally. If the canner is too heavy or if you are using a gas burner, simply turn off the heat.
While the canner is cooling, it is also depressurizing. Do not run the canner under cold water, open the vent port, or remove the weighted gauge before the canner is fully depressurized. These types of forced cooling techniques could lead to food spoilage and could also damage the canner lid.
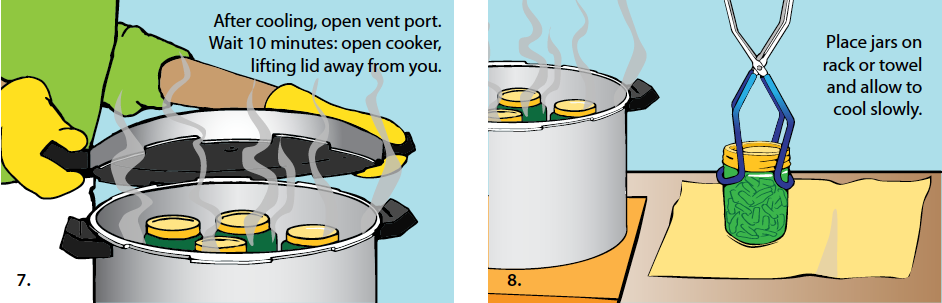
When the canner is depressurized, remove the weight from the vent of weighted-gauge canners or open the petcock of dial-gauge canners. Wait 10 minutes, unfasten the lid, and remove it carefully so that steam from the canner does not burn your face or hands. Do not allow the canner to cool completely before opening, because this could make it difficult to open, and jars that were underprocessed may have a chance to spoil.
Using a jar lifter, remove jars one at a time. Do not tilt the jars. Place hot jars on dry towels or cooling racks, leaving at least 1 inch of space between jars to facilitate cooling.
Allow jars to sit, undisturbed, for 12 to 24 hours. Do not remove metal screwbands or test the seal until the jar is completely cooled.
Testing the Seal
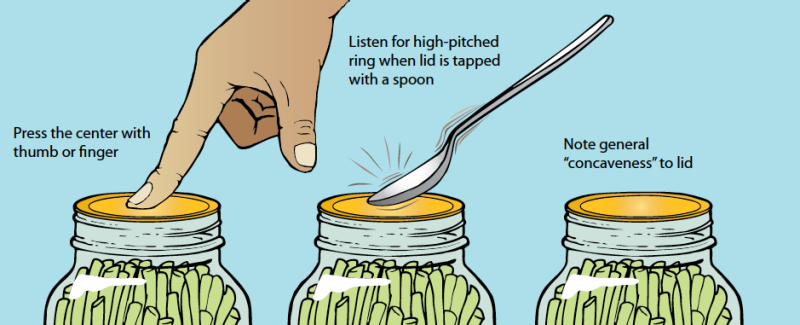
Test the jar seals within 12 to 24 hours of processing— after jars are completely cool — by pressing the center of the lid or tapping the lid with a spoon (figure 11). The lid should stay down and give a clean ringing sound when tapped. If it makes a dull sound, the lid is not sealed. If a jar is not sealed, refrigerate and reprocess within 24 hours or refrigerate and consume within three days.
Reprocessing
Foods from jars that did not seal should be reprocessed within 24 hours. Check the jar and lid for nicks. Pack food into a new container if necessary and use a new lid; process using the same method. Label as “reprocessed” and consume first.
Labeling and Storage
Remove screwbands to prevent them from rusting on to the jars. Wash any food residue from the jars. Label the jars with the date, contents, and lot number (if more than one batch was processed on a single day). This provides trace-back information if one jar spoils. Canned products should be stored in a cool, dry area between 50 F and 70 F for up to one year. After a year, home-canned products may still be consumed; however, overall quality and nutritional value may have diminished. Discard badly dented, swollen, and/or rusty cans.
Handling Spoiled Canned Food
Look closely at all jars of food before opening them. Bulging lids or leaking jars are signs of spoilage. When you open the jar, look for spurting liquid, mold, or an unusual odor. Do not taste foods that show signs of spoilage. The USDA no longer recommends scraping mold off the top of jellies and jam products. Molds produce mycotoxins — chemical substances known to be carcinogenic to animals.
Spoiled jars of low-acid foods need to be detoxified prior to disposal. If the jar is still sealed, place it in a heavy garbage bag and dispose of it in a landfill. If the jar is not sealed, be extra careful not to come in contact with the food or any liquid from the food. Boil the jar and lid for 30 minutes in water that is 1 inch above the jar. The food can now be disposed of in a trash can. Using one part unscented bleach in five parts clean water, clean all surfaces and containers that may have come in contact with the questionable food.
Troubleshooting
There are three basic problems that can arise if proper pressure canning procedures are not followed: jars don’t seal, cosmetic problems, and spoilage. Possible causes of a jar that won’t seal include:
Overfilled jars.
Chipped jar rims.
Particles of food on the jar rims coming between the rim and the sealing compound in the lid.
Lids are too hot or too cold.
Scratched sealing compound in the lid.
Screwbands being tightened after jars are removed from the canner, breaking the seals.
Bent or rusty screwbands not holding the lid against the jar rim tightly enough during processing.
Recipes
The following recipes are taken from the National Center for Home Food Preservation website.
Meatless Spaghetti Sauce
30 pounds tomatoes
1 cup chopped onions 5 cloves garlic, minced
1 cup celery or green pepper, chopped
1 pound fresh mushrooms, sliced (optional)
¼ cup vegetable oil
2 tablespoons oregano
4 tablespoons minced parsley 2 teaspoons black pepper
4½ teaspoons salt
¼ cup brown sugar Yield: 9 pints
Directions:![]()
![]()
Prepare pressure canner and canning equipment according to the guidelines described previously. Wash tomatoes and dip them in boiling water for 30-60 seconds or until skins split. Dip in cold water and slip off skins. Remove cores and quarter tomatoes. Boil for 20 minutes, uncovered, in a large saucepan. Put through a food mill or sieve.
Sauté onions, garlic, celery or peppers, and mushrooms (if desired) in vegetable oil until tender. Combine sautéed vegetables and tomato pulp and add remainder of spices, salt, and sugar. Bring to a boil. Simmer, uncovered, until thick enough for serving. At this time, the initial volume will have been reduced by nearly one-half. Stir frequently to avoid burning.
Fill jars, leaving a 1-inch headspace. Adjust jar lids and process in a dial gauge pressure canner (11 pounds of pressure) or weighted gauge pressure canner (10 pounds of pressure) in pints for 20 minutes or quarts for 25 minutes.
Caution: Do not alter the proportions of onions, peppers, or mushrooms. Doing so may affect the acidity of the product and require a different processing method.
Spaghetti Sauce With Ground Meat
30 pounds tomatoes
2½ pounds ground beef or sausage 1 cup chopped onions
5 cloves garlic, minced
1 cup celery or green pepper, chopped
1 pound fresh mushrooms, sliced (optional) 4½ teaspoons salt
2 tablespoons oregano
4 tablespoons minced parsley 2 teaspoons black pepper
½ cup brown sugar Yield: 9 pints
Directions:
Prepare pressure canner and canning equipment according to the guidelines described previously. Wash tomatoes and dip them in boiling water for 30-60 seconds or until skins split. Dip in cold water and slip off skins. Remove cores and quarter tomatoes. Boil for 20 minutes, uncovered, in a large saucepan. Put through a food mill or sieve.
Sauté beef or sausage until brown; drain the fat. Add garlic, onion, celery or green pepper, and mushrooms (if desired). Cook until vegetables are tender. Combine with tomato pulp in a large saucepan. Add spices, salt, and sugar. Bring to a boil. Simmer, uncovered, until thick enough for serving. At this time, the initial volume will have been reduced by nearly one-half. Stir frequently to avoid burning.
Fill jars, leaving a 1-inch headspace. Adjust jar lids and process in a dial gauge pressure canner (11 pounds of pressure) or weighted gauge pressure canner (10 pounds of pressure) in pints for 60 minutes or quarts for 70 minutes.
References
National Center for Home Food Preservation (NCHFP). www.uga.edu/nchfp/index.html.
USDA. 2009. USDA Complete Guide to Home Canning. U.S. Department of Agriculture National Institute of Food and Agriculture. Agriculture Information Bulletin No. 539. www.uga.edu/nchfp/publications/publications_usda.html.
White, A., A. Ford, E. L. Andress, and J. A. Harrison. 2006. So Easy to Preserve. 5th ed. Athens: University of Georgia Cooperative Extension Service
Virginia Cooperative Extension materials are available for public use, reprint, or citation without further permission, provided the use includes credit to the author and to Virginia Cooperative Extension, Virginia Tech, and Virginia State University.
Virginia Cooperative Extension is a partnership of Virginia Tech, Virginia State University, the U.S. Department of Agriculture (USDA), and local governments, and is an equal opportunity employer. For the full non-discrimination statement, please visit ext.vt.edu/accessibility.
Publication Date
December 5, 2019