

Vegetable Gardening in Containers
ID
426-336 (SPES-255P)
 EXPERT REVIEWED
If you don’t have space for a vegetable garden or if your present site is too small, consider raising fresh, nutritious, homegrown vegetables in containers. A window sill, patio, balcony, or doorstep can provide sufficient space for a productive container garden. Problems with soil-borne diseases, nematodes, or poor soil can also be overcome by switching to container gardening
Grow vegetables that take up little space, such as carrots, radishes and lettuce, or crops that bear fruits over a period of time, such as tomatoes and peppers, for best use of space and containers. Dwarf or miniature varieties often mature and bear fruit early, but most do not produce as well overall as standard varieties. With increasing interest in container gardening, plant breeders and seed companies are working on vegetables specifically bred for container culture. These varieties are not necessarily miniature or dwarf and may produce as well as standard types if properly maintained.
The amount of sunlight that your container garden spot receives may determine what crops can be grown. Generally, root crops and leaf crops can tolerate partial shade, but vegetables grown for their fruits generally need at least six hours of full, direct sunlight each day and perform better with eight to ten hours. Available light can be increased somewhat by providing reflective materials around the plants (e.g., aluminum foil, white-painted surfaces, marble chips).

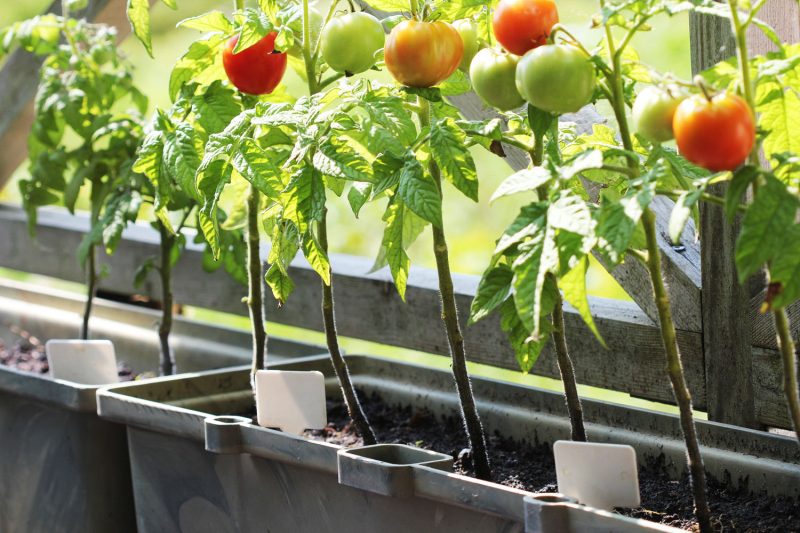
Container gardening lends itself to attractive plantscaping. A dull patio area can be brightened by the addition of barrels of cherry tomatoes or a colorful herb mix. Planter boxes with trellises can be used to create a cool, shady place on an apartment balcony. Container gardening presents opportunities for many innovative ideas.
Containers
There are many possible containers for gardening. Clay, wood, plastic, and metal are some of the suitable materials. Containers for vegetable plants must (1) be big enough to support plants when they are fully grown, (2) hold soil without spilling, (3) have adequate drainage, and (4) never have held products that would be toxic to plants or people.
Consider using barrels, cut-off milk and bleach jugs, window boxes, clothes baskets lined with plastic (with drainage holes punched in it), even pieces of drainage pipe or cement block. If you are building a planting box out of wood, you will find redwood and cedar to be the most rot-resistant, but bear in mind that cedar trees are much more plentiful than redwoods. Wood for use around plants should never be treated with creosote or pentachlorophenol (Penta) wood preservatives. Penta and creosote may be toxic to plants as well as harmful to people. Likewise, wood that has been pressure-treated with a chromated copper arsenic compound (CCA) is no longer available for home use. For safer alternatives, look for wood treated with waterborne compounds, alkaline copper quat (ACQ) or copper azole (CBA), which are sold under trade names such as Preserve, NatureWood, or Natural Select.
Some gardeners have built vertical planters out of wood lattice lined with black plastic, then filled with a lightweight medium; or out of welded wire, shaped into cylinders, lined with sphagnum moss, and filled with soil mix. Depending on the size of your vertical planter, 2 inch diameter perforated, plastic pipes may be needed inside to aid watering.
Whatever type of container you use, be sure that there are holes in the bottom for drainage so plant roots do not stand in water. Most plants need containers at least 6 to 8 inches deep for adequate root growth. As long as the container meets the basic requirements described above it can be used. The imaginative use of discarded items or construction of attractive patio planters is a very enjoyable aspect of container gardening. For ease of care, dollies or platforms with wheels or casters can be used to move the containers from place to place.
This is especially useful for apartment or balcony gardening so that plants can be moved to get maximum use of available space and sunlight and to avoid destruction from particularly nasty weather.
Media
A fairly lightweight potting mix is needed for container vegetable gardening. Soil straight from the garden usually cannot be used in a container because it may contain too much clay. Clay soil consists of extremely small (microscopic) particles. In a container, the bad qualities of clay are exaggerated. It holds too much moisture when wet, resulting in too little air for the roots, and it pulls away from the sides of the pot when dry. Container medium must be porous to support plants, because roots require both air and water. Packaged potting soil available at local garden centers is relatively lightweight and, if of high quality, may make a good container medium. Soilless mixes, such as peatlite mix, are generally too light for container vegetable gardening, not offering enough support to plant roots. If the container is also lightweight, a strong wind can blow plants over, resulting in major damage. Also, soilless mixes are sterile and contain few nutrients, so when fertilizers are added, trace elements must be included. If you wish to use a sterile mix you may add garden soil for weight and better water holding capacity but remember it will introduce insects, weeds, and diseases. For a large container garden, the expense of prepackaged or soilless mixes may be quite high. Try mixing your own with one part peat moss; one part garden loam; one part clean, coarse (builder’s) sand or perlite; and a slow-release fertilizer (14-14-14) according to container size. Lime may also be needed to bring the pH to around 6.5. In any case, a soil test is helpful in determining nutrient and pH needs, just as in a large garden.
Planting
Plant container crops at the same time you would if you were planting a regular garden. Fill a clean container to within 1 to 2 inches of the top (depending on the size of the container) with the slightly damp soil mixture. Peat moss in the mix will absorb water and mix much more readily if wetted before putting the mix in the container. Sow the seeds or set transplants according to instructions on the package. Put a label with the name, variety, and date of planting on or in each container. After planting, gently soak the soil with water, being careful not to wash out or displace seeds. Thin seedlings to obtain proper spacing when the plants have two or three leaves. If cages, stakes, or other supports are needed, provide them when the plants are very small to avoid root damage later.
Watering
Pay particular attention to watering container plants. Because the volume of soil is relatively small, containers can dry out very quickly, especially on a concrete patio in full sun. Watering daily or even twice daily may be necessary. Apply water until it runs out the drainage holes. On an upstairs balcony, this may mean neighbor problems, so make provisions for drainage of water. Large trays filled with coarse marble chips work nicely. However, the pot should never be in direct contact with the drainage water as it will be absorbed and keep the soil too wet. The soil should never be soggy or have water standing on top of it. When the weather is cool, container plants may be subject to root rots if maintained too wet. Clay pots and other porous containers allow additional evaporation from the sides of the pots, and watering must be done more often. Small pots also tend to dry out more quickly than larger ones. If the soil appears to be getting excessively dry (plants wilting every day is one sign), group the containers together so the foliage creates a canopy to help shade the soil and keep it cooler. On a hot patio, you might consider putting containers on pallets or other structures that will allow air movement beneath the pots and prevent direct contact with the cement. Check containers at least once a day and twice on hot, dry, or windy days. Feel the soil to determine whether or not it is damp. Mulching and windbreaks can help reduce water requirements for containers. If you are away a lot, consider an automatic drip emitter irrigation system.
Fertilizing
If you use a soil mix with fertilizer added, then your plants will have enough nutrients for eight to ten weeks. If plants are grown longer than this, add a water-soluble fertilizer at the recommended rate. Repeat every two to three weeks. An occasional dose of fish emulsion or compost will add trace elements to the soil. Do not add more than the recommended rate of any fertilizer, since this may cause fertilizer burn and kill the plants. Container plants do not have the buffer of large volumes of soil and humus to protect them from over-fertilizing or overliming. Just because a little is good for the plants does not guarantee that a lot will be better.
General care
Vegetables grown in containers can be attacked by the various types of insects and diseases that are common to any vegetable garden. Plants should be periodically inspected for the presence of foliage-feeding and fruit-feeding insects as well as the occurrence of diseases. Protect plants from very high heat caused by light reflection from pavement. Move them to a cool spot or shade them during the hottest part of the day. Plants should be moved to a sheltered location during severe rain, hail, or wind storms and for protection from early fall frosts.
Indoor container gardening with vegetables
If you want fresh, homegrown vegetables over the winter, or if you don’t have an outdoor space in which you can place containers, it is worth trying some indoor container gardening. Of course, you cannot have a full garden in the house, but a bright, sunny window can be the site for growing fresh food all year. Some small-fruited tomatoes and peppers, several types of lettuce, radishes, and many herbs are among the plants you can include in the indoor garden.
Follow directions given above for preparing pots and for watering, fertilizing, etc. However, note that plants will dry out less quickly indoors and will also grow more slowly, needing less fertilizer. To make watering easy it is wise to set the pots in large trays with an inch or two of decorative stones in them. Not only will this prevent your having to move the plants in order to water them, which may discourage you from watering when you should, but it will also provide humidity, which is a major requirement, especially during winter when the house is warm and dry.
As mentioned before, a sunny, south-facing window is a must for indoor vegetable growing. Fruiting vegetables, such as tomatoes and peppers, will also need supplemental light, such as a combination warm-white/cool-white fluorescent fixture, during winter months. Insufficient light will result in tall, spindly plants and failure to flower and set fruit.
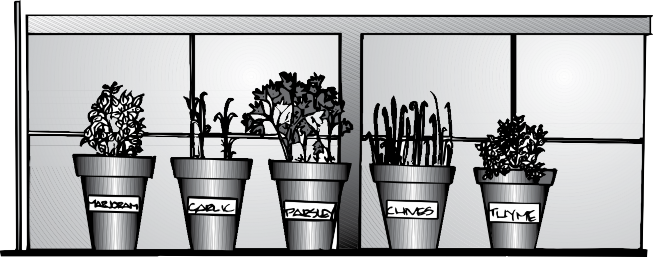
Herbs are a first choice for many indoor gardeners. Many are less demanding than vegetable plants, and cooks find it pleasant to be able to snip off a few sprigs of fresh parsley or chop up some chives from the windowsill herb garden. Chives grow like small onions with leaves about 6 inches tall. These plants prefer cool conditions with good light, but will grow quite well on a windowsill in the kitchen. One or two pots of chives will provide leaves for seasoning salads and soups. Plant seeds in a 6-inch pot. The plants should be about 1 inch apart over the entire surface area. It will require about 12 weeks from the time seeds are planted until the first leaves can be cut. For variety, try garlic or Chinese chives, which grow in a similar fashion, but have a mild garlic flavor.
Parsley seeds can be planted directly into 6-inch pots, or young, healthy plants can be transplanted from the garden. One vigorous plant per pot is enough. Standard parsley develops attractive, green, curly leaves about 6 or 8 inches tall. Italian, or flat-leaved, parsley has a slightly stronger flavor and is a favorite for pasta dishes. Leaves can be clipped about 10 to 12 weeks after planting the seeds.
Cilantro, or the leaves of the young coriander plant, can be grown in the windowsill garden. Cilantro is used in Oriental and Mexican dishes and must be used fresh. Grow cilantro as you would parsley. Thyme and other herbs will also grow well indoors if given the right conditions.
The small-fruited varieties of tomato, such as Tiny Tim, Small Fry, and Roma (a paste tomato), may be raised quite satisfactorily in the home. They will challenge your gardening ability and supply fruits that can be eaten whole, cooked, or served with salad. The Tiny Tim tomato grows to a height of about 12 to 15 inches. Small Fry, which is about 3 feet tall, and Roma will need more space and should be located on an enclosed porch or in a sun room. It may also be worth experimenting with varieties developed for hanging baskets.
Some of the small-fruited peppers may be grown as indoor plants. Like tomatoes, they require warm, bright conditions to grow well indoors. Fruits will be ready to harvest from peppers and tomatoes about ten weeks after planting. Whiteflies and aphids may present a problem on indoor tomato and pepper plants. Keep a close watch for these pests so they do not get a good start in your planting. Yellow sticky traps, either purchased or homemade, are effective in trapping whiteflies. Insecticidal soap or other pesticides approved for vegetable plants can be used to control aphids. Fortunately, you will be less likely to experience problems with outdoor pests, such as tomato hornworm, corn earworm (in peppers), and late blight, than you would if plants were outside.
For a quick-growing crop, try radishes. These must be grown very rapidly if they are to be crisp and succulent. Scatter radish seeds on moist soil in a 6-inch pot. Cover with 1/4- inch of soil, and place a piece of glass or plastic wrap over the pot to conserve moisture until the seeds germinate. Carrots are slower, but can be grown in the same way; use the small-rooted varieties, such as Little Finger, for best results indoors.
Experiment with various types of lettuce. Leaf lettuce and the miniature Tom Thumb butterhead are some to try. Space them according to package directions. Keep lettuce moist and in a very sunny spot. If light is limited, an old standby for fresh taste and high food value is sprouted seeds. Almost any seeds can be sprouted: corn, barley, alfalfa, lentil, soybean, rye, pea, radish, mung bean, sunflower, etc. Use only special seeds for sprouting available from health food or grocery stores to avoid the possibility of getting seeds treated with poison, such as antifungal agents. Use any wide-mouthed container, such as a Mason or mayonnaise jar. Soak seeds overnight, drain, and place in the container. Cover with a double cheesecloth layer held with rubber bands or a sprouting lid. Set the container in a consistently warm spot, and rinse and drain seeds two or three times daily. In three to five days, sprouts will be 1 to 3 inches long and ready for harvesting.
| Vegetable* Light Requirement** | Minimum Container Size | Distance (inches) Between Plants in Containers | Days from Seed to Harvest | Comments |
|---|---|---|---|---|
| Beans, bush FS | 2 gal. | 2-3 | 45-60 | Several plantings, two-week intervals |
| Beets FS/PS | 1/2 gal. | 2-3 | 50-60 | Thin plants when 6 to 8 inches tall |
| Carrots FS/PS | 1 qt. | 2-3 | 65-80 | Several plantings, two-week intervals |
| Cabbage FS/PS | 5 gal. | 12-18 | 65-120 | Requires fertile soil |
| Chard, Swiss FS/PS | 1/2 gal. | 4-6 | 30-40 | Harvest leaves for long yield |
| Cucumbers FS | 5 gal. | 14-18 | 70-80 | Require hot weather, vining types need support |
| Eggplant FS | 5 gal. | 1 plant per container | 75-100 | Requires fertile soil |
| Kale FS/PS | 5 gal. | 10-15 | 55-65 | Harvest leaves |
| Lettuce, leaf PS | 1/2 gal. | 4-6 | 30-35 | Harvest leaves |
| Mustard greens PS | 1/2 gal. | 4-5 | 35-40 | Several plantings, two-week intervals |
| Onions, green FS/PS | 1/2 gal. | 2-3 | 70-100 | Require lots of moisture |
| Peppers, Bell FS | 2 gal. | 1 plant per container | 110-120 | Require hot weather |
| Radishes FS/PS | 1 pint | 1 | 25-35 | Several plantings, weekly intervals |
| Squash, summer FS | 5 gal. | 1 plant per container | 50-60 | Plant only bush type |
| Tomatoes FS | 5 gal. | 1 plant per container | 55-100 | Stake and prune or cage |
| Tomatoes, cherry FS | 1 gal. | 1 plant per container | 55-100 | Helps to stake and prune |
| Turnips FS/PS | 3 gal. | 2-3 | 30-60 | Harvest leaves and roots |
* Consult seed catalogs for varieties adapted to container culture.
** FS=Full sun • FS/PS= Full sun; tolerates partial shade • PS=Partial shade”
Virginia Cooperative Extension materials are available for public use, reprint, or citation without further permission, provided the use includes credit to the author and to Virginia Cooperative Extension, Virginia Tech, and Virginia State University.
Virginia Cooperative Extension is a partnership of Virginia Tech, Virginia State University, the U.S. Department of Agriculture (USDA), and local governments, and is an equal opportunity employer. For the full non-discrimination statement, please visit ext.vt.edu/accessibility.
Publication Date
September 16, 2020
