

ENERGY SERIES: What about Caulking and Weather-Stripping?
ID
2908-9017 (BSE-304NP)
The greatest source of wasted heating and cooling energy in a home is air leaks. If you have a pair of 6' 8" exterior doors in your home that do not have weather-stripping, you can easily have an opening of ¼" all along the edge where the doors meet. This ¼" gap adds up to a 20-square-inch opening to the outside. If you saw a hole this big in your wall, wouldn’t you want it fixed?
In hot, humid climates our biggest concern is hot air coming into our air-conditioned home. However, during winter the opposite occurs, our heated homes leak warm air to the outdoors through cracks and crevices. Airsealing (caulking and weather-stripping) are effective ways to rid your home of these costly leaks. Actually, all air leaks should be sealed with appropriate caulk or weather-stripping. Generally, you can use caulk to seal openings up to ¼ inch wide.
There are also sealant products that come in aerosol cans; these are generally a good option for closing holes up to ½ inch. Be sure to follow manufacturers’ directions. For larger gaps, foam backing material should be put in place before caulking. In addition, leaks around electrical outlets can be handled by installing foam “gaskets,” which are specifically made for this application, behind outlet plates.
Where should you caulk and seal?
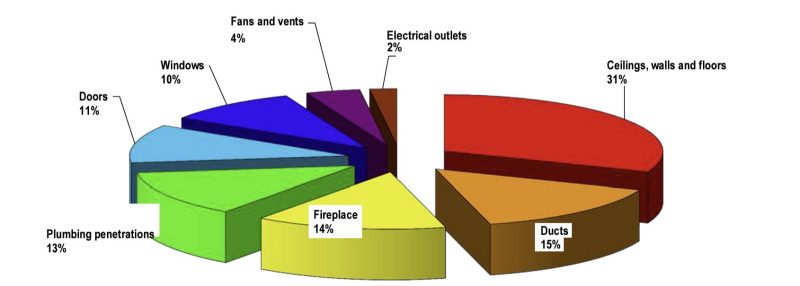
Windows and doors are the obvious places to check for leaks; you should also check where plumbing, ductwork, fans, or electrical wiring penetrates through exterior walls, floors, and ceilings. Figure 1 shows the most common sources of air leaks in a typical home.
How do you check your home?
When looking for drafts, start by visually inspecting penetrations in ceiling, walls, and floors. For windows, check the outside for any sign of caulking that has cracked or peeled. Make a simple draft-checker by taping a piece of tissue paper to a dowel. On a windy day, move the draft- checker around windows, doors, electrical outlets, ceiling fixtures, attic hatches and other locations inside your home where there is a possible air path to the outside. Air movement around these spots could mean an air leak. You can repeat the process while running your kitchen or bathroom exhaust fan (if they vent to the outside).
When checking for leaks around doors and windows use a dollar bill: insert the dollar bill in the opening. If it falls out or slips out easily, the weather-stripping should be repaired or replaced.
Increasingly, blower doors are used to measure the leakiness of the home (see Figure 2).

What about caulk?
Caulk is used to permanently seal air leaks, cracks, and gaps between window or door frames and your home’s siding. Most caulk is packaged in tubes that fit a standard caulking gun. When shopping, you will find many different products, with prices ranging from two to fifteen dollars or more per tube. Be sure to read the labels and select the products that will work best for your particular application. If possible, opt for higher- quality; cheaper products may last only a few years, while premium-priced caulks are normally designed to last 20 years or more.
For more information on choosing the correct type of caulking for your project visit:
https://www.energy.gov/energysaver/weatherize/air-sealing-your-home/caulking
General rules for applying caulking and other sealants include:
Always apply to a clean, dry surface.
Apply in a continuous stream avoiding stops and starts.
Make sure to fill the crack or gap completely and reapply if necessary.

For more information on how to apply caulk visit www.nrel.gov/docs/fy01osti/28039.pdf.
What about weather-stripping?
Weather-stripping is material that is used to seal moveable joints like doors and windows. There are several types of material that can be used, with varying cost, durability, and ease of installation. You should choose a product that can withstand the conditions of its specific location; consider friction, temperature, weather, and wear. For doors and windows that are used most frequently, use more permanent types of weather-stripping. The additional time and money spent installing these items will pay off in decreased energy bills and maintenance costs. When installed correctly, weather-stripping should allow your doors and windows to open properly and seal well when closed. For more information on choosing the correct weather- stripping product for your project visit: https://www.energy.gov/energysaver/weatherize/air-sealing-your-home/weatherstripping
Doors
Weather-stripping around exterior doors can be checked with a flashlight. With the interior and exterior lights off, move the flashlight slowly around the outside closed door edge. If a helper inside the house can see light shining in, weather- stripping is needed. Weather-stripping should be installed on the door jamb so the material creates a seal with the exterior face of the door on the top and both sides.
Door sweeps, thresholds, and door shoes are good ways to seal gaps under exterior doors. A door sweep, a strip of metal (often with a flexible rubber or plastic edge), can be used on a door with no threshold. The sweep is connected at the bottom of the door, either inside or outside, depending on how the door moves. A gasket threshold replaces an existing threshold and can be attached to the floor directly under the door. Please note that this type of gasket wears quickly in high traffic areas. Door shoes have rubber or plastic gaskets set into a metal bracket. This shoe is affixed to the door bottom and can be used with any threshold not worn in the middle.
Windows
Adding or replacing weather-stripping on windows is more complicated than on doors, because it has to be placed in the tracks as well as above, below, and between the sashes. Metal or plastic v-channel weather-stripping should be used in the tracks of the windows and in between the sashes. This may have a self-adhesive backing but will still need nails or staples to secure it permanently. A self- adhesive foam or vinyl weather-stripping can be used between the upper and lower sashes and the frame.
References and resources
Depending on your income, you may qualify for a free home energy audit and energy efficiency improvements. Check out: https://www.energy.gov/eere/wipo/weatherization-and-intergovernmental-programs-office for more information.
Portions of this document are modified with permission from Home Series-1: Home Tightening, Insulation and Ventilation, originally developed by the Iowa Energy Center. https://www.iowaeconomicdevelopment.com/userdocs/programs/HomeSeries1.pdf
Amann, J., Wilson, A., and Ackerly, K. 2007. Consumer Guide to Home Energy Savings. 9th Edition. American Council for an Energy- Efficient Economy, Washington, D.C.
Carll, C. 2006. The Ins and Outs of Caulking. United States Departmen t of Agriculture Forest Service. https://www.fpl.fs.fed.us/documnts/fplgtr/fpl_gtr169.pdf
Energy Savers: Caulking. EERE: Energy Savers Home Page.
https://www.energy.gov/energysaver/weatherize/air-sealing-your-home/caulking
Energy Savers: Weatherstripping. EERE: Energy Savers Home Page.
https://www.energy.gov/energysaver/weatherize/air-sealing-your-home/weatherstrippingWeatherize Your Home— Caulk and Weather Strip. 2001. National Renewable Energy Laboratory (NREL). US Department of Energy. http://www.nrel.gov/docs/fy01osti/28039.pdf
Many of the large home improvement stores have detailed information about this topic on their Web sites, search using the term “caulk”.
Developed as part of the NASULGC/DOE Building Science Community of Practice. The factsheet editors are: Robert "Bobby" Grisso, Ph. D., Extension Engineer, Biological Systems Engineering; Martha A. Walker, Ph.D, Community Viability Specialist, Central District; Philip Agee, Ph. D., Assistant Professor, Department of Building Construction, and John Ignosh, Extension Specialist, Biological Systems Engineering, Virginia Tech.
DISCLAIMER – This document is intended to give the reader only general factual information current at the time of publication. It is not a substitute for professional advice and should not be used for guidance or decisions related to a specific design or construction project. This document is not intended to reflect the opinion of any of the entities, agencies or organizations identified in the materials and, if any opinions appear, are those of the individual author and should not be relied upon in any event.
Virginia Cooperative Extension materials are available for public use, reprint, or citation without further permission, provided the use includes credit to the author and to Virginia Cooperative Extension, Virginia Tech, and Virginia State University.
Virginia Cooperative Extension is a partnership of Virginia Tech, Virginia State University, the U.S. Department of Agriculture (USDA), and local governments, and is an equal opportunity employer. For the full non-discrimination statement, please visit ext.vt.edu/accessibility.
Publication Date
March 26, 2020
