

Soil Sampling Instructions for the Farm
ID
SPES-141
Correctly collecting a soil sample is one of the most important steps in a soil testing program! The reliability of a soil test can be no better than the sample submitted. For results that can be depended on, it is vitally important to take samples that accurately represent the soil in your fields. When one considers that a one pound soil sample must adequately represent millions of pounds of soil in the area being sampled, the importance of doing a good job of sampling becomes apparent.
Here are instructions for collecting a good representative soil sample:
1. Get soil sample information sheets and boxes. These may be obtained from your local Extension office. Follow the directions on the sheet, which are also available on-line as fillable forms at https://www.soiltest.vt.edu/fees-and-forms.html.
2. Sample when the soil is not too wet. A soil sample is a composite of numerous sub-samples, and it will be impossible to mix together those sub-samples if they stick to themselves. Soil moisture level is good for sampling when soil breaks apart easily after being squeezed into a ball. Sampling in the fall allows time to apply lime to adjust the soil pH before next year’s growing season, plus it avoids possible delays in getting test results just before planting time, which is the lab’s busiest testing period. For areas recently limed or fertilized, delay sampling at least six to eight weeks.
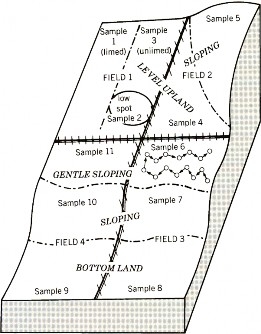
3. Divide farm into Areas or Fields or Management Units from which you will send the lab one soil sample. If the field is uniform, one sample will do. But most fields will have been treated differently, or the slope, drainage, or soil type will make it desirable to divide the field into small areas of 5 to 10 acres each.
Sample odd spots separately, or if too small to be managed separately, then avoid altogether. If there are visible differences in soils or crop growth in a field, then separate samples should be taken from each uniform area. Large areas in a field that have been manured, limed, fertilized, or otherwise treated differently should be sampled separately.
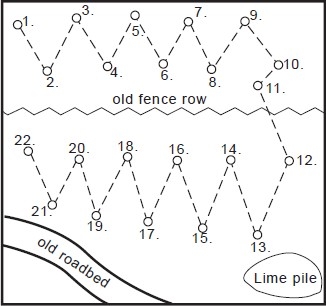
4. Obtain a good sample of soil. The soil test can be no better than the sample. Take the sample from 20 or more places in the field. Zig-zag across the field or area as shown in the diagram. When taking the sample, avoid unusual places, which are not representative of the entire field, such as old fence rows, old roadbeds, eroded spots, back furrow, small depressions, where lime or manure have been piled, or in the fertilizer band of row crops.
Samples should be made up of at least 5 subsamples or cores from each acre represented by the sample.
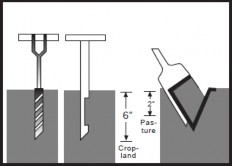
5. Use proper sampling tools. Sampling may be made with a stainless steel or chrome-plated soil tube, soil auger, or spade. Do not use brass, bronze, or galvanized tools because they will contaminate samples with copper and/or zinc.
The desired depth for cropland is plow depth (6 to 8 inches or more), and 2 to 4 inches for pasture land, or no-till crop fields. Place sample in clean container.

6. Mix well in a clean plastic pail. (Use plastic to avoid micronutrient contamination.) From the 20 or more stops, you now have one gallon or more of soil. Mix the soil thoroughly removing roots, stalks and rocks, then fill the half-pint sample box about 90% full with mixed, loose soil.

Moist soils can be mailed to the lab, but if a sample is wet, then allow the soil to air-dry before sending it the lab. Do not heat the sample by putting it in a conventional or microwave oven. Oven-drying a sample can change test results. Air-drying samples before mailing will save on shipping cost and processing time in the lab.
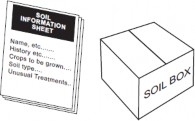
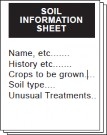
7. Fill out a Soil Sample Information Sheet for each sample. It is essential that your name, mailing and electronic addresses, and sample number be plainly written on the sheet that you send with each sample. (Forms are online at www.soiltest.vt.edu and can be filled in before printing.) To obtain the best recommendations, it is important that the last crop, liming history and soil map unit symbols for prominent soils in the field be stated. Use permanent ink to write Your Sample ID on the sample box and ensure that the same ID is put on the matching Sample Sheet.
8. Mail to laboratory. Place any payment and the Soil Sample Information Sheet with the corresponding soil sample box inside a sturdy, suitable shipping container and ship to Virginia Tech Soil Testing Lab, 145 Smyth Hall (0465), 185 Ag Quad Ln, Blacksburg, VA 24061.
Soil sampling for precision farming
Precision farming, also known as site-specific management, typically employs intensive soil sampling to map fertility in a field. Fertilizer and lime may then be applied at variable rates, according to the needs of the particular areas in the field. To begin, fields are first divided into grids, with typical grid size being 2.5 acres. For small fields, a one acre grid size will give a more precise representation of the fertility across the field, but for larger fields, this is usually not economically feasible. The grid is established using the Global Positioning Satellite (GPS) system.

A radio receiver, connected to a portable computer, and mounted on an ATV, is used to receive satellite coordinate signals to map the field and locate the grid points. Soil samples are then collected at each grid point, with 6-8 subsamples being taken in a 10' circle around the ATV, and mixed together for a composite sample. After lab analysis, soil test information from the field can then be fed into a computer mounted in a variable-rate fertilizer/lime spreader with GPS receiver, and material can then be applied according to the needs of the various areas in the field.
“Smart sampling” techniques may also be employed to sample a field. This may be done in lieu of the above standard (uniform) grid sampling or as a follow up to an initial grid sampling of the entire field. “Smart sampling” consists of sampling those areas of the field that are obviously different, such as with respect to topography (hilltops, low areas), or if a combine yield monitor has been used, high-yielding and low-yielding areas in the field. If yield data are not available, one often has a good idea of the high- yielding and low-yielding areas in their field. These should be sampled separately. If the field has been mapped, it can be divided by soil series (i.e., soil mapping unit). Grid points should be located or grouped in those areas with unique visible or measurable differences.
Virginia Cooperative Extension materials are available for public use, reprint, or citation without further permission, provided the use includes credit to the author and to Virginia Cooperative Extension, Virginia Tech, and Virginia State University.
Virginia Cooperative Extension is a partnership of Virginia Tech, Virginia State University, the U.S. Department of Agriculture (USDA), and local governments, and is an equal opportunity employer. For the full non-discrimination statement, please visit ext.vt.edu/accessibility.
Publication Date
June 3, 2024
