

Reducing Labor When Using Temporary Electric Fencing
ID
SPES-709P
 EXPERT REVIEWED
Introduction
One of the biggest drawbacks to using temporary electric fencing to intensify management in a grazing system is the amount of labor required. This publication, one of four in a series on rotational grazing, focuses on how to plan and use available tools and techniques to reduce much of the labor and hassle associated with temporary electric fencing.
Train animals to electric fencing
Unlike other fences that create a physical barrier, an electric fence is a psychological barrier. Therefore, the system must be set up to maintain an adequate voltage to deter or contain livestock. Livestock should be “trained” to electric fencing, ensuring that their first exposure to it is in a low-stress environment where they can explore and receive a memorable shock. For example, place animals in a receiving area or sacrifice pasture near feed or water where they are sure to encounter the training fence. Some producers place a strand of temporary electric fencing off an existing perimeter fence where livestock like to travel. Make sure the fence voltage reads at least 5,000 volts during training. Livestock that are well-trained for electric fencing will typically respect it well thereafter. Many producers state that if their fences are routinely kept at a minimum of 3,000-5,000 volts for cattle or 7,000 volts for sheep, the psychological impact is reinforced so well that their livestock will respect the fence even during periods when electricity may be lost.
Install an energizer and grounding system
When an existing electrical source is not available, a solar energizer can be used (fig. 1). These are portable energizers that rely on a gel or lithium battery to supply power, and the battery is recharged by a solar panel.
Most solar energizers have an output of less than 0.5 joules, which is generally adequate for use with temporary electric fencing that is less than 1,500 feet long. Larger solar energizers with up to about 2 output joules are available and would be required to electrify more extensive systems.
Energizers that use only a deep-cycle (marine) battery are also available. With this type of energizer, the battery must be recharged fairly frequently, which often means purchasing a second battery to use while the first one is recharging. Battery-only energizers are quickly becoming obsolete because of the increased effectiveness of solar energizers.
Because of their relatively small electrical output, the grounding system required for solar energizers under 0.5 joules is relatively small. Typically, a single 2- to 3-foot galvanized ground rod is adequate (fig. 1).

See Virginia Cooperative Extension publication SPES- 688, “Electric Fencing: How to Select and Install an Energizer” (https://bit.ly/44bgxs5) for more information on the proper installation of an energizer and grounding system.
Develop a system for organizing and carrying temporary fencing supplies
Some people may find moving, hauling, and reinstalling temporary fence posts and wire to be cumbersome, heavy, and time-consuming. Some of these hurdles can be minimized or overcome by finding a system for organizing and carrying temporary fencing supplies.
Some producers who prefer walking have reported using a golf bag in which to carry posts. Many who prefer a four-wheeler or all-terrain vehicle have installed a rack (figs. 2a-2b) for organizing and carrying equipment.
Some producers have even designed reel mounts to allow hands-free unspooling of wire (figs. 2c-2e).
Figure 2. Various systems can be designed to carry and install temporary fencing components. (Photo credits: Bobby Drumheller, Augusta County, Virginia [2a and 2e], Gabe Pent, Virginia Cooperative Extension [2b], Greg Judy. Boone County, Missouri [2c and 2d].)


Explore various styles of temporary fencing supplies
Multiple companies sell posts, reels, wire, energizers, and other temporary electric fencing accessories in a wide variety of styles. Exploring the options available may provide solutions to specific challenges associated with installing and using temporary electric fencing.
Some common examples are included below.
Wire
Early efforts with temporary fencing often used light- gauge smooth electric wire, which was heavy and cumbersome. Almost all producers now use lightweight polyethylene twine or braid containing multiple small wires, often collectively referred to as “poly wire” (fig. 3). In fact, many such products are now commercially available, with different ranges in price, electrical conductivity, visibility, physical strength, and longevity.


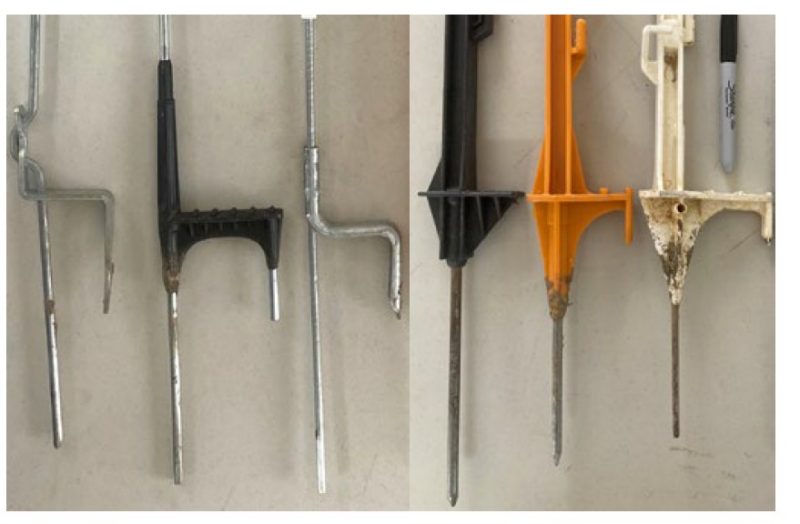
Ringtop vs. pigtail posts
Ringtop-style posts are a recent improvement over pigtail-style posts, which have a reputation for tangling during storage and transport (fig. 5).

Both are useful styles for attaching wire while it is carrying electrical current. Older designs only allowed one wire to be used, but some newer designs provide clips that can be snapped onto the post to enable the use of additional wires.
Post footstep and spike style
Some styles of post footstep are noticeably small and challenging to use when wearing bulky or mud-covered boots (fig. 6).
Additionally, some styles of footsteps are easily broken, while some are reinforced to provide additional strength. Posts also vary in spike length and diameter, which can influence how easily they go into rocky or hard soils.
Plastics used in the construction of temporary posts vary in quality. Higher-quality plastics typically contain UV light stabilizers and resist becoming brittle over time.
Wire attachments
Several basic post-to-wire attachment styles are available for use with electric poly wire or poly tape (fig. 7). Clip-style attachments that require manipulation to remove the wire are generally less desirable.

Alternatively, hook-style attachments allow the wire to be easily hooked or unhooked, enabling the fence to be moved while still electrified.
Reel types
Reels fall into two main types: geared and non- geared. With non-geared reels (fig. 8a), the spool rotates one time with each rotation of the handle. Geared reels (fig. 8b), which typically operate at a 3:1 ratio, rotate the spool multiple times with each rotation of the handle. Geared reels take in wire faster, but they are heavier. Because any type of reel can become heavy, some models feature a frame with a neck strap that can be helpful (fig. 8c).

Tumblewheels
Tumblewheels (fig. 9) are a commercially available fencing system patented and marketed exclusively by Gallagher USA. This fence consists of several electrified “wheels,” made up of six spikes attached to a center hub, spaced across the pasture. The wheels are held upright with the tension of a single poly wire that passes through the center of each wheel’s hub.

When one or both ends of the fence are moved, the wheels roll along. When the person moving the fence stops, the fence also stops. The design of the
Tumblewheel hub ensures that with each turn of the wheel, the spokes that are touching the ground no longer conduct electricity. Farmers who have tried the Tumblewheel system claim it saves a lot of time and labor; however, the cost may be prohibitive for some farms.
Automatic gate release timers
A relatively new technology available to aid in rotating cattle is the automatic gate release, which uses a timed mechanism to release a standard electric spring gate. The Batt-Latch Gate Release Timer is a portable, solar-powered automatic gate opener. It is pre-programmable and can also be set up to operate via phone text command. It is patented and produced by Stradbally Farm Services, Ltd., and is available for purchase directly from Stradbally or through several U.S. vendors. PensAgro also manufactures a solar gate opener. A similar battery-powered product is manufactured by Teeter Farm Tech and marketed through multiple U.S. distributors.
Automatic pole-mounted poly wire lifters
Several companies manufacture a pole-mounted mechanism for automatically raising and lowering electric poly wire at predetermined times, allowing livestock to move to new pastures. PensAgro manufactures a battery-powered model that is recharged by a solar panel. Hidden Creek Pasture offers a similar product as well (fig. 10).

Use a common-sense approach and plan ahead
- To make walking easier, follow the contour of the field as much as possible when installing temporary fencing in hilly terrain.
- Avoid making an empty-handed trip when installing temporary fencing on foot. For example, carry posts and unspool wire on the first pass across the field (you may want to drop half the posts at the halfway point), then install posts on the return pass
- When grazing winter-dormant pastures, such as stockpiled tall fescue, consider allowing livestock to “back graze” to the water source by not installing a back fence. Back grazing or allowing animals to graze areas where they have already grazed can also be acceptable during the growing season without
- damaging plants, as long as it is no longer than about seven days to minimize consumption of regrowth.
- Install forward fences ahead of time to cover multiple moves when strip-grazing. For example, many farmers who work off-farm jobs use the weekend to set up all the fencing needed for the upcoming week. When moving livestock to a new allocation of pasture during the week, they simply open the end of the fence without removing it entirely. This requires multiple reels of wire and additional posts, but it enables labor to be planned for times convenient to the farmer.
- Avoid frozen ground by installing posts ahead of time when freezing weather is forecasted. When installing temporary posts in already frozen ground, a rubber mallet may be helpful.
- Because ice can pull down the poly wire, plan to move livestock to a sacrifice area when icy weather is forecasted or get out early before cattle realize the fence is down and strip ice off the fence.
- Consider installing permanent wooden or large- diameter fiberglass posts for making lanes and turns, or for hanging reels at critical points where fields are typically divided with temporary fencing.
Low stress livestock moves
Moving livestock can sometimes be challenging. Any animal with an aggressive or flighty temperament can undermine attempts at frequent rotation, particularly with temporary fencing, and should be culled. Moving cows with young calves can at times be difficult, especially calves under three or four days old. Usually, this only lasts a couple of days after calving, as cows grow eager to rejoin the herd and calves become more mobile. However, even older calves can get confused or flighty if they are naïve to pasture rotation. The most common way to deal with these situations is to leave the gate or gap open for a day or two after giving access to the new pasture. Given a little time, even cows with very young calves will typically retrieve them and rejoin the herd. If cows are trained to temporary electric fencing, poly wire can be used to close the gap between pastures. When the poly wire is placed at the right height, calves can go under it to rejoin their mothers at their own pace.
When moving cows with calves, avoid applying excess pressure. Allowing extra time to move the herd and thus not provoking a flight response will encourage cows and calves to pair up before moving. Additionally, the following are practices some managers have found helpful when moving cows with calves:
- Rotate animals in the early morning or evening when they are naturally inclined to move and when cows and calves are likely still paired.
- Wait for the herd to gather at the gate before moving to another pasture to allow cows and calves time to pair up.
- When moving between two pastures that share a fence, try to keep the first cows that pass through the gate from running along the shared fence line. This will help prevent calves on the other side of the fence from turning in the wrong direction.
- When moving to fresh pasture, try to train the herd to controlled movements. Stockmanship experts suggest leading the herd as they enter the new paddock, walking backward in front of the herd, and using just enough pressure on the lead animals to get them to slow or stop their movement as needed. Herds managed in this way will be more likely to move smoothly as a unit.
Put together a grazing toolkit
Because rotational grazing management can involve a significant amount of permanent and temporary fencing and watering infrastructure, keeping a toolkit of commonly needed supplies (fig. 11) handy has proven helpful for many farmers. The following list may be items to consider adding to an individualized grazing toolkit.

- General tools (e.g., adjustable wrenches, screwdrivers).
- Rubber mallet (for tapping temporary posts into frozen ground).
- High-tensile wire cutters.
- Fence pliers.
- Fence staples.
- Voltmeter/Faultfinder.
- Spare energizer fuses.
- Split-bolt connectors (for joining electric fence wire).
- Spare fence insulators.
- High-tensile wire crimp sleeves (including open-tap crimp sleeves) and crimping tool.
- Spare drain plugs and other parts for waterers.
- Spare hose/pipe fittings.
- Cigarette lighter (for melting plastic to expose bare wires when splicing poly wire).
- A livestock marking crayon (for marking animals to be later treated or separated).
- Leather gloves.
- A spare handle for electric fencing.
Technical resources and cost-share information
Soil and Water Conservation Districts (SWCD)
Soil and Water Conservation Districts throughout Virginia offer technical support for grazing management and state-funded cost-sharing to install grazing management infrastructure, including interior fencing, waterers, stream exclusion fencing, and other agronomic practices. Find a list of local offices from the Virginia Department of Conservation and Recreation at “Virginia’s SWCDs by Locality,” https://www.dcr. virginia.gov/soil-and-water/swcdlist.
Natural Resources Conservation Service (NRCS)
Offices throughout Virginia offer technical support for grazing management and federally funded cost- sharing to install grazing management infrastructure, including interior fencing, waterers, stream exclusion fencing, and other agronomic practices. Find a list of U.S. Department of Agriculture Service Centers and associated NRCS offices at “Find Your Local Service Center,” https://www.nrcs.usda.gov/conservation- basics/conservation-by-state/virginia#contact.
Virginia Cooperative Extension (VCE)
The Virginia Cooperative Extension’s Graze 300 website (https://ext.vt.edu/agriculture/graze-300.html) offers information on grazing livestock for 300 days by using better pasture management and environmental stewardship. Extension offices in each county in Virginia offer education and resources from Virginia Tech and Virginia State University, as well as the entire Extension system. Find a list of Virginia’s local offices and regional centers at “Local Offices,” https://ext.vt.edu/offices.html.
Online Manufacturers/Retailers of Popular Temporary Fencing Supplies (no endorsement is implied)
- Electric Fencing Solutions, https://am.gallagher.com/en-US/Solutions/Electric-Fencing-Solutions
- Kencove Farm Fence Supplies, https://Kencove.com
- Premier 1 Supplies, https://premier1supplies.com
- Pasture Management, https://pasturemgmt.com
- Powerflex Rotational Grazing Supply, https://powerflexfence.com
- Timeless Fence System, https://timelessfencesystem.com
- Range Ward, https://rangeward.com
Virginia Cooperative Extension materials are available for public use, reprint, or citation without further permission, provided the use includes credit to the author and to Virginia Cooperative Extension, Virginia Tech, and Virginia State University.
Virginia Cooperative Extension is a partnership of Virginia Tech, Virginia State University, the U.S. Department of Agriculture (USDA), and local governments, and is an equal opportunity employer. For the full non-discrimination statement, please visit ext.vt.edu/accessibility.
Publication Date
August 8, 2025
