

Design and Operation of a Solar-Heated Dry Kiln
ID
420-030 (CNRE-218P)
 EXPERT REVIEWED
Introduction
Lumber is usually dried to a specific moisture content prior to further manufacturing or use. The amount of water in wood is usually expressed as moisture content and can be directly measured or calculated. The moisture content of wood is defined as the ratio of the weight of water in wood to the dry weight of the wood material. While lumber can be air-dried, the humidity in most localities prevents the lumber from reaching the moisture content required for the stability needed for interior use. A dry kiln is required to dry lumber to the necessary final moisture content and does so fairly rapidly. This publication discusses the design and operation of a solar-heated lumber dry kiln that is designed to be inexpensive to construct and simple to operate.
Virginia Tech Solar Kiln Design
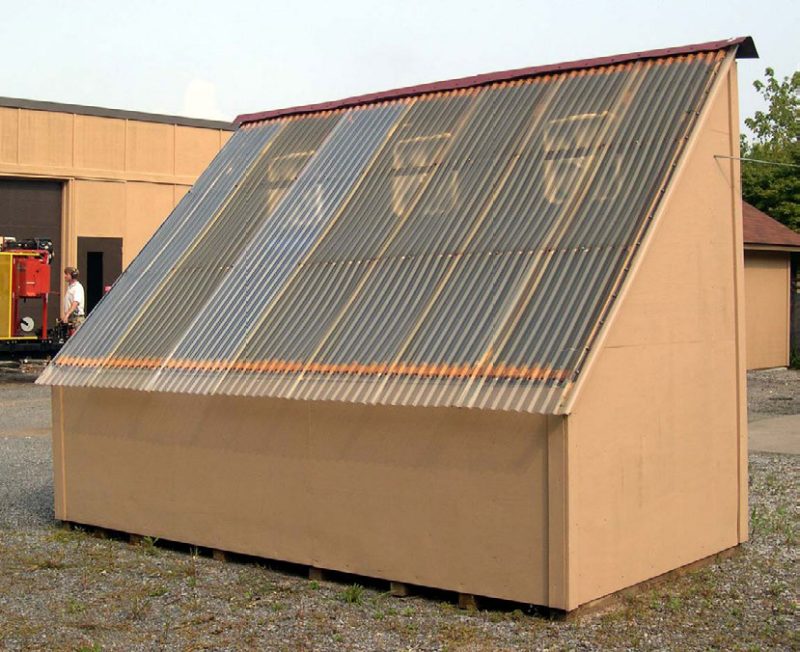
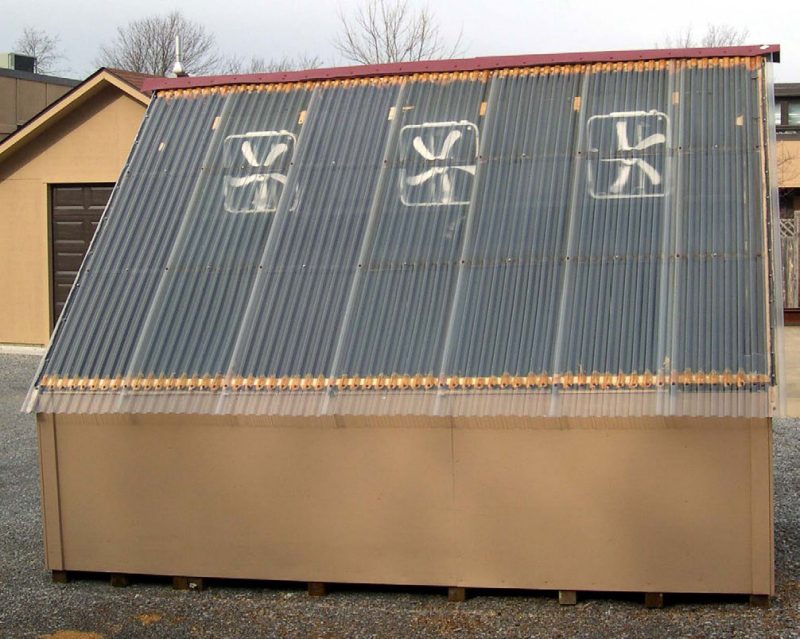
The solar kiln described in this publication was designed, constructed, and tested at Virginia Tech. This design is based on over 40 years of research and development on the solar drying of lumber in the United States and foreign countries. Previous versions of this kiln were designed to hold up to 2,000 board feet1 of lumber. Plans for the older and larger kiln are available for download at https://sbio.vt.edu/extension/resources/vt-solar-kiln.html. The version described here holds 750 to 1,000 board feet of lumber. The kiln dries a load of lumber in approximately one month of moderately sunny weather at its location in Blacksburg, Va. While there are several different types of solar kilns for drying lumber, the kiln described here was designed with two major objectives: 1) be relatively inexpensive to construct and 2) be simple to operate. Drying lumber can be a complex process where accelerating drying without having quality loss often requires extensive knowledge and experience. The design of the Virginia Tech solar kiln is such that extensive knowledge, experience, and control are not required. The size of the collector keeps the kiln from overheating, which causes the wood to check and split. The kiln is simple to construct and utilizes a passive solar collector, four insulated walls, and an insulated floor. The roof is made of clear, greenhouse-rated, corrugated polycarbonate.
1 A board foot is 1-inch thick by 12 inches wide by 12 inches long. To obtain the total number of board feet in a piece of lumber, measure the width in inches, multiply by the length in feet, divide by 12, then multiply by the nominal thickness.
Design Fundamentals
The Virginia Tech solar kiln can hold up to 1,000 board feet of 1-inch thick lumber per charge (or load) and dry a charge in approximately one month of moderately sunny weather in the mid-latitudes of the United States. The kiln is heated when solar energy enters the clear glazing and is absorbed on one of the black-painted interior surfaces. The solar energy heats the air in the collector space, and it is circulated through the lumber using fans. As the heated air circulates, it absorbs moisture from the surface of the lumber. The evaporated moisture increases the relative humidity of the air, and when the humidity in the chamber is too high, it is vented from the chamber through the vents in the rear of the kiln.
Roof Design
This design is very similar to a solar greenhouse. A passive solar collector provides the kiln’s drying heat, which is generated from the sunlight that passes through the roof and strikes a solar collector inside the kiln. Many factors affect how much heat can be obtained from the sunlight. One is the slope of the roof, which in this design is a 45-degree angle to the south. The optimum roof angle is dependent on your location and is typically equal to the latitude of your location. One difficulty in choosing the optimal roof angle is that the optimal angle for solar collection changes with the season since the angle of the sun changes. If you are planning on operating your kiln during the winter months, you can improve your collector’s performance by increasing the roof angle another 10 degrees. For example, Blacksburg, Virginia, has latitude of 37 degrees; therefore, the optimum angle for winter operation would be 47 degrees. We compromised with a 45-degree angle to make construction easier.
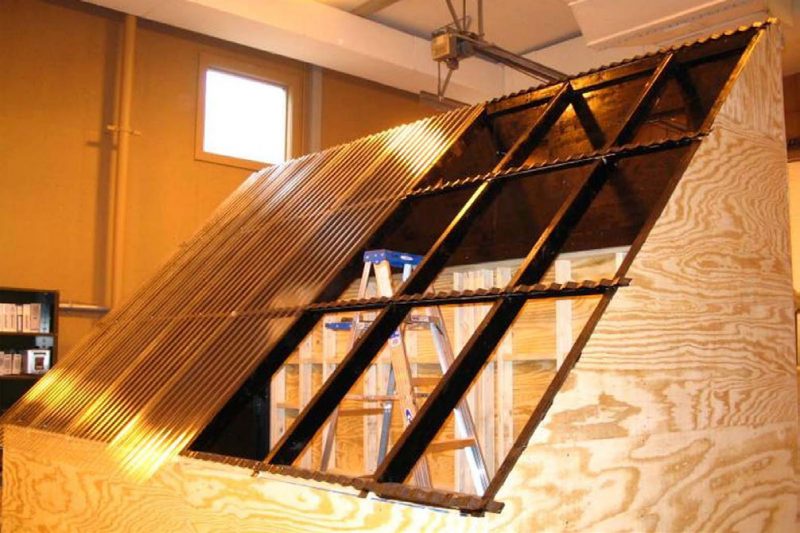
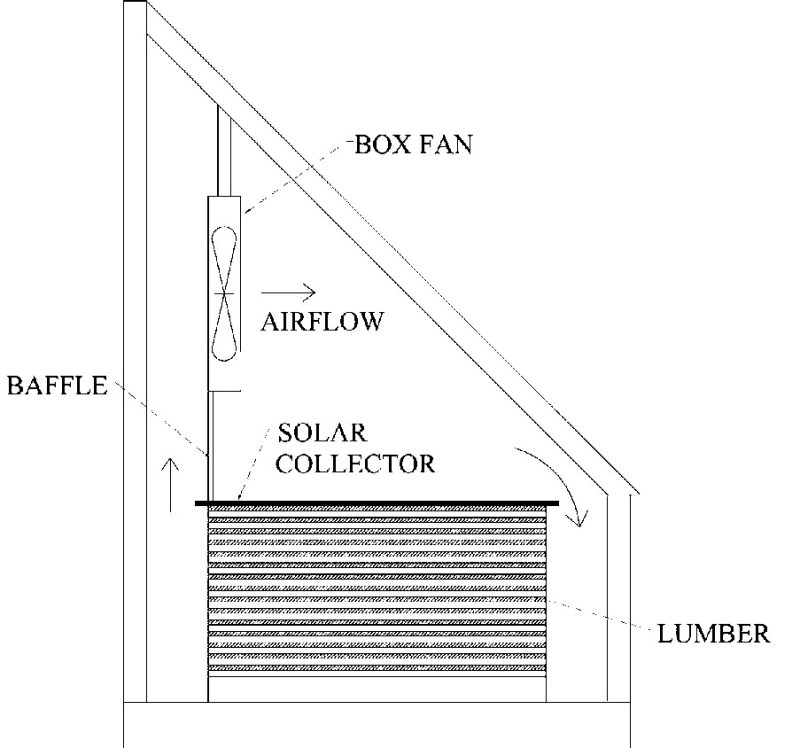
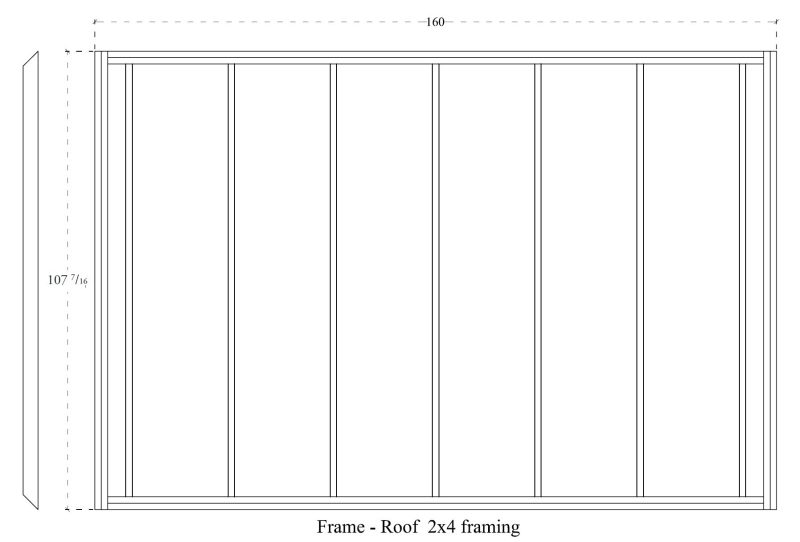
The type of transparent roofing material, or glazing, can also affect the amount of heat energy collected from the sun. The glazing must transmit sunlight through to the solar collector and not reflect it. It must also have some protection from degradation by the sun’s ultraviolet rays. Many different glazings are possible, including glass, polymer plastic films, and fiberglass panels (see References for information on the different types of glazings). This kiln uses greenhouse-rated corrugated polycarbonate known as Tuftex® purchased from the local building supply store. For winter operation or cooler climates, it is best to use two layers of clear roofing. The layers are separated by 2 x 4 material to help to insulate the solar collection area (Figure 1). The roof is framed with fairly wide on-center spacing, which may have to be adjusted to accommodate the width of the covering material and any anticipated snow loads.
The most critical design feature of this dryer is that there is one square foot of collector (i.e., one square foot of sloped, clear roof) for each ten board feet of 1-inch lumber in the dryer. This ratio provides the perfect amount of heat for 1-inch oak, but may provide too much heat for 2-inch or thicker oak or too little for pine or other fast-drying woods. Oak is one of the more difficult drying woods because if it is dried too rapidly, it will crack and check and if dried too slowly, the sapwood may stain and discolor. In general, thicker lumber should be dried more slowly than thinner lumber. The collector area can be increased to provide more heat (for easier drying woods than oak) by extending the roof southward, accompanied with a shorter south wall, or simply loading less material in the kiln (This would increase the collector-to-board-foot ratio). To provide less heat with the same collector, reduce the collector area by covering part of the roof with plywood or other opaque material.
Basic Box Design
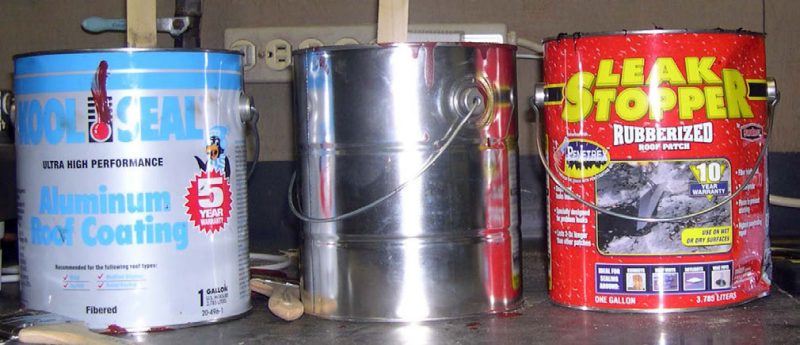
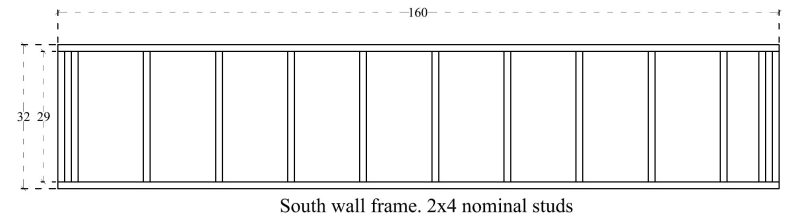
The kiln is constructed using standard framing techniques. The first step is to construct the floor with 2 x 6s, 16 inches on center. The lumber used for the floor should be preservative treated to prevent rot since it will be close to or in contact with the ground. Next, install paper-backed fiberglass batt insulation between the framing members (Figure 2). Cover the top of the batt insulation with a sheet of 0.6-mm plastic to prevent condensation. Finish the floor by placing exterior grade 3/8-inch plywood across the joists. Next, construct the walls of the kiln using 2 x 4 materials, batt insulation, and exterior-grade 3/8-inch plywood on both the interior and exterior of the frame. The plywood inside the kiln was painted with two coats of black rubber-based concrete sealer, which when dry, acts as a vapor barrier and black solar collector. Another option would be to paint two coats of aluminum paint for vapor barrier and then a third coat of black paint to absorb the solar energy. Some examples of sealers are shown in Figure 3.

The exterior is painted with an exterior grade paint to prevent weathering. Be careful not to use a vapor barrier like aluminum paint on the exterior, since any moisture that might migrate into the walls will not have a way to escape to the outside. For this same reason, paper-backed insulation rather than foil-backed insulation is suggested.
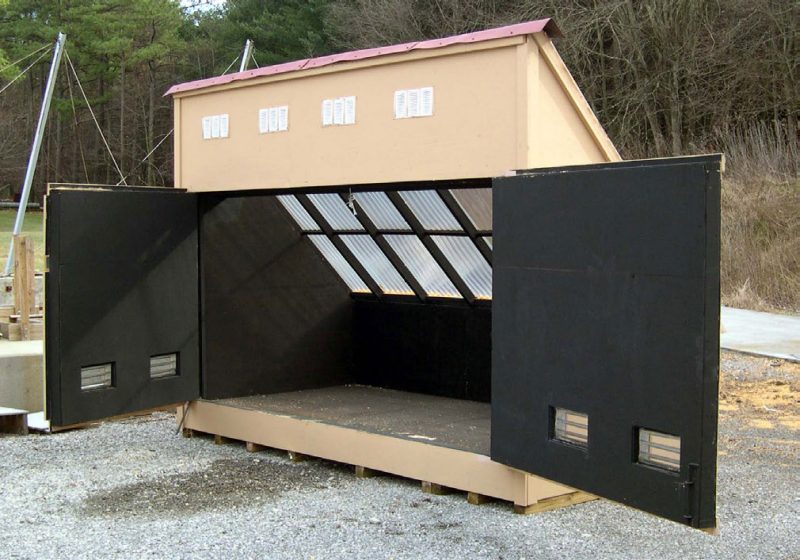
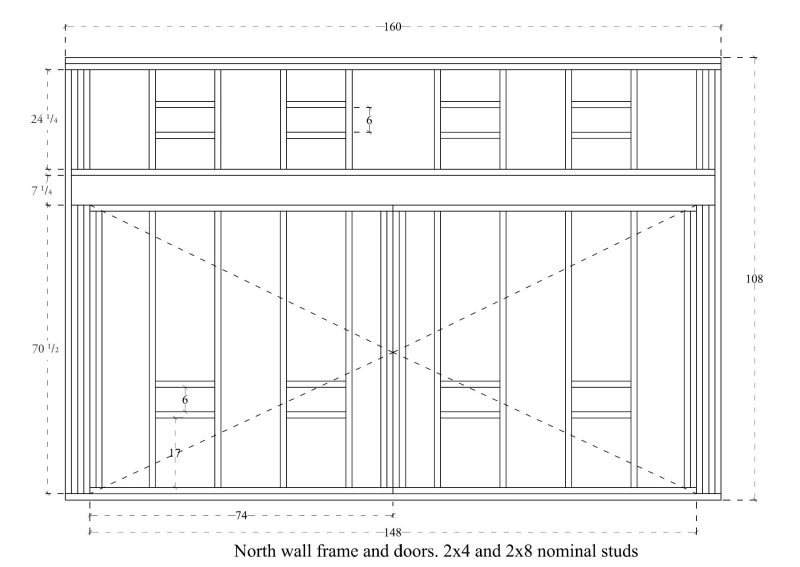
The current design has large doors at the rear of the structure for loading, unloading, and checking kiln samples (Figure 4). Previous versions of the dryer had two access doors at each end (east and west walls) to permit periodic examination of the lumber and measurement of moisture content. The previous version also had a roof hinged to the north wall and the south wall hinged to the floor. This permitted the roof to be raised and south wall lowered to facilitate loading and unloading. You may wish to add these features to the current design. Regardless of the design, vents should be added to the north wall. The vents can be as simple as framed openings with a small piece of plywood to cover the vent when not needed or you can purchase a commercial vent similar to those used for basement and crawlspace ventilation.
The three fans used in this design are inexpensive, three-speed window fans with plastic blades (Figure 5). The fans are fastened to the roof framing about 18-inches in front of the north wall with a plywood shroud or baffle around them extending downward 3 feet below the roof and running the full length of the dryer in order to force the air through the lumber pile (Figure 6). Be careful that whenever the kiln is left empty that you do not leave the doors completely closed since the temperature of an empty kiln can exceed 200˚F, which can damage the plastic fan blades.
Operation of a Solar Dryer
Preparing the Lumber
Green lumber should be end-coated with rubber-based basement sealer or other commercial end coating such as ANCHORSEAL® (wax-based) immediately after sawing to prevent large losses from end checks and splits. End coating is not too effective when applied after the lumber has begun to dry. Lumber should then be stacked in the kiln with a 1-foot clearance on either side of the stack (between the north and south walls and the stack) to permit adequate air circulation, and in neat layers, separated by stickers or spacers running perpendicular to the lumber’s length (Figure 6). The lumber in each layer must be uniform in thickness. If the sawn lumber is quite variable in thickness, one or both faces of the boards should be planed before drying to obtain a uniform thickness and reduce warping during drying. Green lumber should be stacked with stickers quickly after sawing or it may begin to stain, particularly in the warmer months.
Stickers used between each layer of wood are typically 3/4-inch thick, 1-1/4 inches wide, and as long as the lumber pile is wide. It is important that stickers are uniform in thickness and kept dry. Stickers are placed perpendicular to the boards’ length, every 12 to 18 inches along the lumber’s length. The stickers are placed directly above the stickers in the lower layers. If the lumber is of varying lengths, shorter boards are staggered by alternating them from one end to the other with the longest pieces always on the outside edges. The ends of every board should be supported with a sticker. The stickers hold the lumber flat, preventing warp, while allowing air to circulate through the pile and dry the lumber.
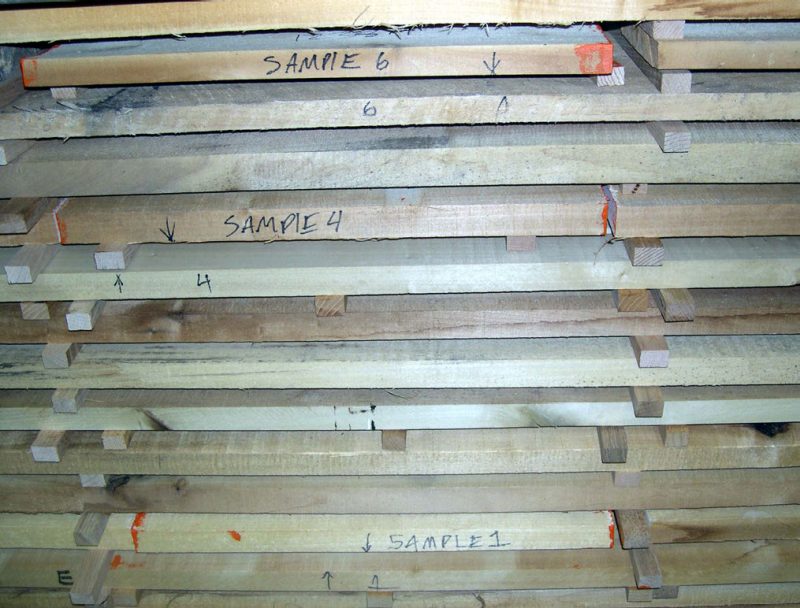
While the lumber is being stacked or prior to loading the kiln with prestacked lumber, this would be the time to cut sample boards, if they are to be used (see Procedures for Cutting and Using Sample Boards). Periodically checking these samples will allow you to determine the moisture content of the lumber in the kiln and observe for possible drying defects. After the lumber is stacked in the kiln, lay a final layer of stickers down and then a black-painted sheet of plywood to act as a cover and collector.
Monitoring the Process
Monitoring the moisture content (MC) can be important when drying a new species or thickness, and knowing when the lumber has reached its desired moisture content. Sample boards can be used to measure the moisture content each day and determine the daily rate of moisture loss. This loss should be compared with the safe drying rate for that species (see Table 1 for hardwoods). If the drying rate is too fast, then it may be necessary to block off part of the collector, or else turn the fans off and open the vents during the hottest part of the day. A moisture meter can also be used once the wood has dropped below 30% MC.
While the solar kiln described in this publication is designed to dry red oak without checking, you may still want to monitor the drying process. Monitoring the moisture loss and quality of the wood during the drying process will help you to maximize the efficiency of the solar kiln. Lumber should be dried to the maximum safe drying rate. The safe drying rate refers to the moisture loss in one day, not the average loss over several days. Table 1 lists the safe drying rate for common 1-inch thick North American hardwoods. Softwoods are typically able to dry at a much faster rate and moisture content losses above 10 percent per day are quite common.
| Species | 1-inch thick | 2-inch thick |
|---|---|---|
| Ash, white | 10.4 | 4.1 |
| Beech | 4.5 | 1.8 |
| Birch, yellow | 6.1 | 2.4 |
| Cherry | 5.8 | 2.3 |
| Elm, American | 10.4 | 4.1 |
| Maple, Soft (Sapwood) | 13.8 | 5.5 |
| Maple, Hard | 6.5 | 2.6 |
| Oak, Red Upland | 3.0 | 1.5 |
| Oak, Red Lowland | 1.0 – 2.5 | - |
| Oak, White Upland | 2.5 | 1.0 |
| Gum (Red Gum) | 5.3 | 2.1 |
| Tupelo (Black Gum) | 10.9 | 4.3 |
| Walnut | 8.2 | 5.5 |
| Yellow-poplar | 13.8 | 5.5 |
When lumber has its highest moisture content, it is the most important to adhere to the safe drying rate. It is during the first one-third moisture content loss that most checking and splitting occurs. Once the lumber dries below 22 percent moisture, the risk of creating new cracks and splits is low. Lumber that is going to be used for interior uses should be dried to a moisture content of 6 percent to 8 percent. This will limit the amount of dimensional changes that would occur when the wood is processed and in service. Lumber that is to be used for exterior purposes is usually dried to 12 percent to 15 percent moisture content. Softwood lumber used for framing is usually dried to 19 percent.
The best method to reduce the drying rate in the solar dryer is to cover up part of the collector. Shutting the fans off will also reduce the drying rate but may result in temperatures high enough to melt the plastic fan blades.
It is impractical to weigh every board in the dryer to measure the moisture loss rate, and electric meters are not accurate above 30 percent moisture content. Therefore, use the sample board method to determine the moisture content of lumber in the kiln. This method uses short, carefully chosen sample boards sawn from larger pieces of lumber and these sample boards are weighed periodically and estimated moisture contents are calculated. Since the wettest or slowest drying lumber in the kiln has the highest risk of splitting and cracking, the sample boards should represent this kind of lumber. Typically, samples should be cut from the most recently cut wood, the widest and thickest boards, lumber with the most heartwood, and boards that are quartersawn.
The temperature inside the kiln will increase during the day until it peaks at mid afternoon and then cools at night. At night, as the air in the kiln cools, the relative humidity will increase significantly. The increase in humidity at night is beneficial in reducing or relieving the drying stresses that developed during the day. The result of drying during the day and increasing humidity at night helps minimize drying stress. Fans should be turned off at night for the same reason.
There are two simple controls that can make operating your solar kiln easier. A simple timer can control the fan operation. The timer can be set to come on at mid morning as the temperature in the kiln increases and to shut the fans off in the evening as the temperatures cool. A humidistat can be used to override the timer for the fans. The humidistat is used to keep the fans off during days when it is raining, causing high humidity, which is detrimental to the drying process.
Modifications to the Design
The dryer is designed to have 1 square foot of collector for each 10 board feet of 1-inch lumber in the kiln. This ratio works well for 1-inch oak, but may provide too much heat for 2-inch or thicker oak and too little heat for pine and other fast drying woods. To dry pine or other fast drying woods, you can reduce the amount of lumber in the kiln, thus increasing the collector to wood volume ration, or increase the collector size. To reduce the collector, cover part of the collector with opaque material.
One modification found in tropical countries is to make a clear south wall. This is not incorporated in the design presented here since there is a significant tradeoff between the area of the collector and the area of insulated, solid walls. The larger the collector size, the more solar energy collected, however, the greater the heat loss in cold weather. For most North American latitudes, the heat loss through the clear south wall negates the greater energy gain that a clear south wall would provide. For this reason, the solar kiln is designed without a clear south wall.
If you want to make your solar kiln entirely solar powered, there are several options available. The two most common are to 1) use a solar collector and converter to solar power the current fans or 2) use a solar collector to replace the fans with DC powered fans. Both optionswill significantly increase the cost of building a solar kiln. At the time of construction of the current kiln, powering the three fans with solar energy increased the construction costs by one-half to two-thirds. For more information on solar powering of fans, see References.
Procedures for Cutting and Using Sample Boards
- Select a few boards from the pack of lumber that represent the slowest drying material. This would be the widest, thickest, and highest moisture-content boards and those boards that contain the most heartwood or are quartersawn.
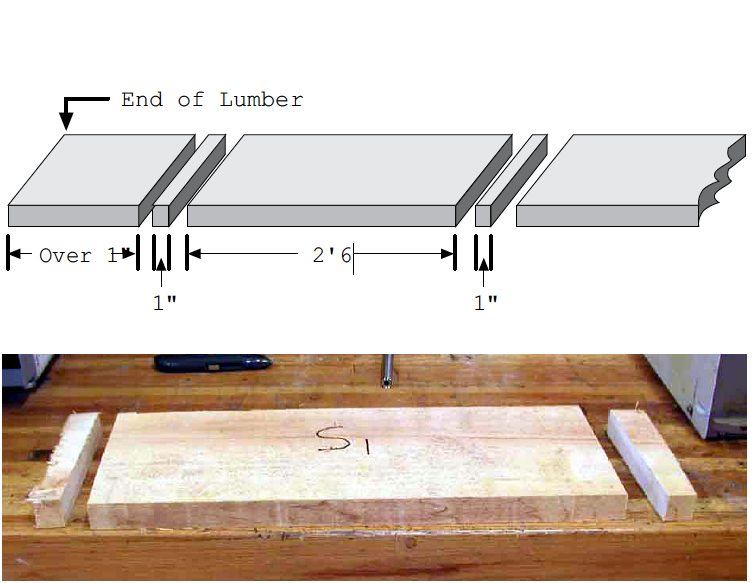
- Cut a 24- to 30-inch sample that is free of knots and at least 12 inches from the end of the board. Then cut two 1-inch sections from the sample board as shown in Figure 7. Make sure to number the sections and sample board.
- Immediately weigh the 1-inch sections (an accuracy of about 1 gram required) and record the weight. Measure rapidly after cutting since it is important that they do not lose weight before weighing.
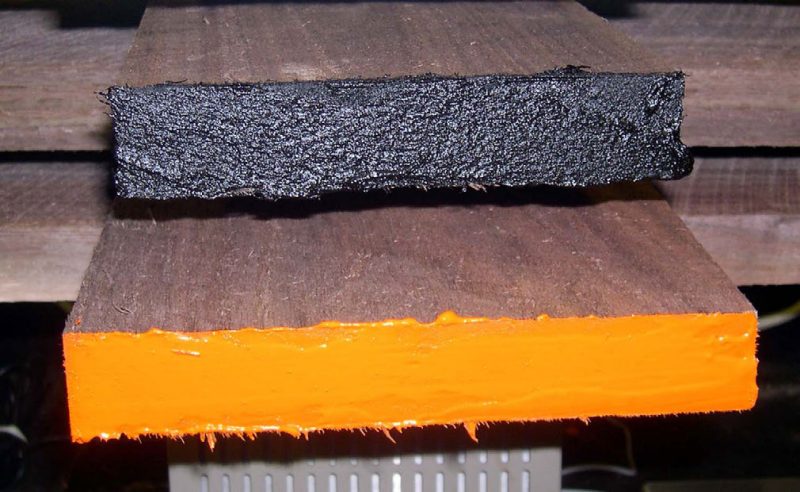
- End coat the sample board with a rubber-based sealing compound or two coats of aluminum paint (Figure 8). Now, weigh the sample board and record weight on sample (an accuracy of 0.1 pound).
- Place sample board in the lumber stack in a location where it will dry at the same rate as the rest of the lumber in the dryer (Figure 9).
- Place the 1-inch sections in an oven at 215º to 218ºF (102º to 103ºC) and dry – usually 18 to 36 hours, depending on the oven – reweigh and obtain the oven dry weight.
- Calculate the moisture content (MC) of each section and average the MC of two sections to obtain the MC of the sample board.

- Estimate oven dry (OD) weight of sample board using average MC above and weight from step 4. and record so this it can be used for future moisture content calculations.

- To determine the moisture content at any time, reweigh the sample board and calculate.

References
Virginia Tech Solar Kiln
Plans, construction, and operational information
https://sbio.vt.edu/extension/resources/vt-solar-kiln.html
Glazing Materials
Greenhouse Management Online. Unit 3, Glazing Materials.
https://greenhouse.hosted.uark.edu/Unit03/Section02.html
Solar Powered Fans
Creative Energy Technologies Inc
2872 State Rte 10
Summit, NY 12175 USA
www.cetsolar.com/solar.htm
Lumber Drying
These publications can be downloaded from https://research.fs.usda.gov/products/publications.
Simpson, W.T., ed. 1991. Dry Kiln Operator’s Manual. United States Department of Agriculture. Forest Service. Forest Products Laboratory. Madison, Wis.
Denig, J., Wengert, E.M., and Simpson, W.T. 2000. Drying Hardwood Lumber. United States Department of Agriculture. Forest Service. Forest Products Laboratory. General Technical Report. FPL-GTR-118.
Forest Products Laboratory. Air Drying of Lumber. United States Department of Agriculture. Forest Service. Forest Products Laboratory. General Technical Report. FPL-GTR-117.
Acknowledgments
Special thanks to those who assisted with the design and construction of the solar kiln: Rick Caudill, Kenny Albert, Fred Lamb, and Omar Espinoza. Some information for this publication was adapted from: Wengert, E.M. Solar Heated Lumber Dryer for the Small Business. MT # 20 Utilization and Marketing. Virginia Cooperative Extension Service. Virginia Tech. Blacksburg, Va. April, 1980.
Disclaimer: Commercial products are named in this publication are for informational purposes only. Virginia Cooperative Extension does not endorse these products and does not intend discrimination against other products which also may be suitable.
Appendix
List of Materials and Estimated Cost (2005 dollars)
SOLAR LUMBER DRYER - LIST OF MATERIALS
Construction Lumber:
| Length (feet) | Dimensions (inch) and type | Qty |
|---|---|---|
| 8 | 2 x 4 No. 2 | 58 |
| 10 | 2 x 4 No. 2 | 14 |
| 14 | 2 x 4 No. 2 | 12 |
| 14 | 2 x 8 No. 2 | 2 |
| 8 | 4 x 4 Treated | 6 |
| 8 | 2 x 8 Treated | 15 |
| 14 | 2 x 8 Treated | 5 |
| 112 | ||
| Plywood | QTY |
|---|---|
| 3/4 Ext. Grade Plywood (floor) | 4 pcs |
| 2/8 Ext. Grade Plywood (walls) | 20 pcs |
| Collector Material | QTY |
|---|---|
| 26” x 12’ PVC panel |
7 pcs |
| Insulation Material | Coverage Area |
|---|---|
| Square feet of insulation material (R11 3-1/2x15) |
300 sq ft |
| Paint | QTY |
|---|---|
| Tar-type coating for interior | 5 gals |
| Exterior Paint | 5 gals |
| Other Materials | QTY |
|---|---|
| Framing nails | 1 box |
| Barn hinges | 4 pcs |
| Staples | 1 box |
| Polyethylene sheet | 1 sheet |
| Box fans | 3 pcs |
| Vents | 8 pcs |
| Material | Approximate Costs ($ in 2005) |
|---|---|
| Construction lumber |
$ 640 |
| Exterior-grade plywood |
$ 606 |
| Fasteners | $ 68 |
| Insulation |
$ 75 |
| Paint and coating |
$ 58 |
| Other materials |
$ 245 |
| Collector materials |
$ 174 |
| TOTAL | $ 1,866 |


Virginia Cooperative Extension materials are available for public use, reprint, or citation without further permission, provided the use includes credit to the author and to Virginia Cooperative Extension, Virginia Tech, and Virginia State University.
Virginia Cooperative Extension is a partnership of Virginia Tech, Virginia State University, the U.S. Department of Agriculture (USDA), and local governments, and is an equal opportunity employer. For the full non-discrimination statement, please visit ext.vt.edu/accessibility.
Publication Date
June 16, 2026
