


Dry Curing Virginia-Style Ham at Home: A Step-By-Step Guide
ID
458-223 (FST-513P)
 EXPERT REVIEWED
This publication is intended for personal use to cure hams at home and not to prepare cured hams for sale.
Key Steps When Dry Curing Ham at Home
- Choose a fresh, high-quality ham and keep it refrigerated below 40°F before and during curing to help produce a safe, high-quality product.
- Apply the dry cure correctly and maintain the recommended temperatures and curing times so the salt and curing agents can protect and preserve the ham.
- Allow the ham to equalize, optionally smoke it, and age it under controlled temperature and humidity to develop the traditional Virginia-style flavor and texture.
- Prevent spoilage during aging by controlling insects, mold, and moisture through proper sanitation, wrapping, ventilation, and storage conditions.
- Cook the finished ham safely to an internal temperature of 145°F with a 3-minute rest, then slice it thinly for the best flavor and serving quality.
The History of Virginia-Style Ham
Virginia ham was one of the first agricultural products exported from North America. The Reverend Mr. Andrew Burnaby enthusiastically reported that Virginia pork was superior in flavor to any in the world (Burnaby 1775). Another early clergyman, the Reverend Mr. John Clayton, wrote to the Royal Society in England that Virginia ham was as good as any in Westphalia (Force 1844).
Today, after more than three centuries of progress, Virginia ham remains a high-quality product due to its distinctive, savory taste. For do-it-yourselfers who want to cure and age a ham that will recapture the delightful flavor so highly cherished by these early clergymen, specific rules must be followed. This publication provides basic steps that can be applied to curing your own ham at home.
Choosing the Right Fresh Ham for Curing
A high-quality, cured ham requires that you start with the proper type of high-quality fresh ham. Such fresh hams come from young, healthy, fast-growing hogs with a desirable lean-to-fat ratio. Fresh hams can be purchased from a retail store or a local meatpacker who is inspected by the U.S. Department of Agriculture or the Virginia Department of Agriculture and Consumer Services (VDACS) Office of Meat and Poultry Services (or another state’s equivalent inspection service).
Hams for curing should have a long, thick cushion, a deep and wide butt face, minimal seam and external fat, as seen on the collar (figure 1) and alongside the butt face (figure 3a), and should weigh fewer than 24 pounds. Heavier hams are typically fattier and are more likely to spoil before the curing agents can penetrate, preventing deterioration. Therefore, one’s capability to control temperature and relative humidity determines the type of ham to cure.
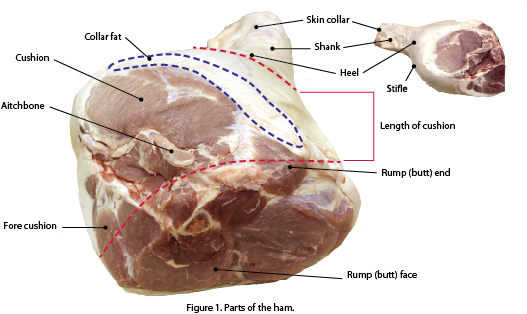
Types of Fresh Hams
A country-style ham has a long shank (solid bone) and a butt cut at the sacral joint. This style of cutting leaves less lean meat exposed in the shank and butt areas, which reduces the possibility of spoilage (figure 2a).
A regular-cut ham style of cut is satisfactory for curing and aging hams under controlled temperature and humidity conditions. The shank is cut short, exposing an open bone with marrow and lean tissue around the bone (figure 2b). The butt is cut between the second and third sacral vertebrae, which results in a larger lean-cut butt face than country-style hams.


How to Identify a Quality, Fresh Ham
Figure 3a illustrates a high-quality ham that has a firm, bright-colored lean with at least a small amount of marbling (specks of fat in the lean) in the butt face.

Figure 3b shows the type of ham to avoid. Its muscles are soft, usually pale in color, and lack marbling. They also “weep” excessively and will shrink more during curing. The open seams between the muscles may increase bacterial and insect invasion.

Keep the Hams Properly Chilled
If purchasing a fresh ham, buy it from an inspected retailer (e.g., a grocery store, local inspected meat processor). If preparing your own fresh ham, chill the carcass to below 40° F before it is cut. For both, maintain a temperature below 40° F until ready to prepare Virginia-style country ham.
Steps for Creating and Applying Cure to Ham
The cure mix to use to prepare a Virginia-style dry-cured ham depends on personal preference. Salt alone is acceptable. However, most people prefer the dry sugar cure. For every 100 pounds of fresh meat, use:
- 8 pounds salt
- 2 pounds sugar
- 2 ounces saltpeter or sodium nitrite (commercially available)
Mix these ingredients thoroughly and divide into two equal parts. Apply the first half on day No. 1 and the second portion on day No. 7 of the curing period.
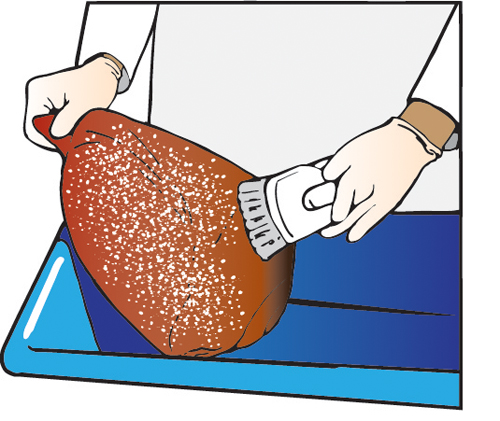
Rub the curing mixture into all lean surfaces (figure 4) of the ham. Cover the skin and fat, but a little will be absorbed through these surfaces. Take care to pack the exposed end of the shank with the curing mixture to prevent bone sour or spoilage. Care should also be taken to make sure plenty of the mixture is applied to the area around the aitchbone (pelvis).

Storing Hams During the Curing Process
After the cure is applied, hams should be placed on well-draining shelves so any water that is lost will drain away from the meat. Meat will readily absorb flavors from the surroundings, so pine and similar fragrant wood should be avoided. Plastic can be used.
Continued temperature control of 36 to 40° F - as measured by a thermometer - during curing is essential for a good, finished product.
Recommended Curing Times for Virginia-Style Ham
Virginia-style hams should be cured for seven days per inch of cushion depth (see figure 3a), or one and a half days per pound of ham. Keep accurate records when placing hams in the cure. Also, record the date to remove hams from the cure on the calendar, as shown.
Early December is the best time to start curing Virginia-style hams under ambient conditions. During the curing period, keep hams at a temperature of 36 to 40° F.
Washing and Soaking Ham After Curing
When the curing period has passed, place the hams in a tub of clean, cold water (no higher than 70°F) for one hour. This will dissolve most of the surface curing mix and make the meat receptive to smoke. After soaking, scrub the ham with a stiff-bristle brush and allow it to dry (figure 5).
Equalizing the Cure in Dry-Cured Hams
After the cure is removed by washing, the cured ham should be stored in a 50 to 60° F environment for approximately 14 days to permit the curing agents to be distributed evenly throughout the ham. The ham will shrink approximately 8 to 10 percent during cure application and equalization.
Smoking Techniques for Virginia-Style Ham
You can smoke your ham to accelerate drying and add flavor. The Smithfield-style ham is smoked for a long time at a low temperature (lower than 90° F). Wood from hardwood species of trees (trees that shed their leaves in the fall) should be used to produce the smoke. Hickory is the most popular, but apple, plum, peach, oak, maple, beech, ash, or cherry may be used. Do not use pine, cedar, spruce, and other needle-leaf trees for smoking meat, because they give off a resin that has a bitter taste and odor.
The fire should be a “cool,” smoldering type that produces dense smoke. Keep the temperature of the smokehouse below 90° F. Hang hams in a smokehouse so that they don’t touch each other. Hams should be smoked until they become chestnut brown in color, which may take one to three days.
How to Finish Unsmoked Cured Ham
If you choose not to smoke your ham after cure equalization, for every 100 pounds of ham, rub with the following thoroughly mixed ingredients:
- 2 pounds black pepper
- 1 quart molasses
- 1 pound brown sugar
- 1 ounce saltpeter
- 1 ounce cayenne pepper
Bag the hams as shown in figures 5a-c.


Aging Your Ham for Flavor Development
The aging period is the time when the characteristic flavor is developed. It may be compared to the aging of cheeses.
Age hams for 45 to 180 days at 75 to 95° F with a relative humidity of 55 to 65 percent. Use an exhaust fan controlled by a humidistat to limit mold growth and prevent excessive drying. Air circulation is needed — particularly during the first seven to 10 days of aging —to dry the ham surface. Approximately 8 to 12 percent of the initial weight will be lost.
Pests will be attracted to your ham while it is aging, such as the cheese skipper, larder beetle, and red-legged ham beetle. Mites, which are not insects, also may infest cured meats.
Cheese skipper
This insect gets its name from the jumping habit of the larvae, which bore through cheese and cured meats. Meat infested with this insect quickly rots and becomes slimy. Adult flies are two-winged and are one-third the size of houseflies. They lay their eggs on meat and cheese and multiply rapidly (figure 6a).

Larder beetle
This insect is dark brown and has a yellowish band across its back. The adult is about 1/3- inch long. Its larvae feed on or immediately beneath the cured meat surface, but do not rot the meat. The larvae are fuzzy, brownish, and about 1/3-inch long at maturity (figure 6b).

Red-legged ham beetle
The larvae are purplish and about 1/3-inch long. They bore through the meat and cause it to dry rot. Adults are about 1/4-inch long and a brilliant greenish-blue color with red legs and red at the bases of their antennae. They feed on the meat’s surface (figure 6c).

Mites
Mites are whitish and about 1/32- inch long at maturity. Parts of meat infested with mites appear powdery (figure 6d).

Figures 6a-6d. Insect illustrations were modified from Home and Garden Bulletin No. 109, U.S. Department of Agriculture, Washington, D.C.
Recommended prevention includes starting the curing and aging during cold weather when these insects are inactive. Proper cleaning of the aging and storage areas is essential because the cheese skipper feeds and breeds on grease and tiny scraps of meat lodged in cracks. Cracks should be sealed with putty or plastic wood after cleaning. Install screens to prevent insects from entering, especially flies, ants, and other insects that carry mites. Double-entry doors are recommended to reduce insect infestation.
After cleaning and sealing cracks, apply a surface spray to the floor so the thin layer of insecticide will kill crawling insects. Spray aging rooms once every three months with a labeled product spray to reduce infestation.
Follow mixing and application directions on the pesticide label. If applied as a spray, remove all meat products from the storeroom before spraying all surfaces on which houseflies and other pests are likely to crawl. Allow the spray to dry before any meat is returned to the storeroom.
If any product becomes infested after precautions have been taken, it should be removed from the storeroom, and the infested area should be trimmed. The trim should be deep enough to remove larvae that have penetrated along the bone and through the fat. The uninfested portion is safe to eat but should be prepared and consumed promptly. The exposed lean of the trimmed areas should be protected by greasing it with oil (e.g., canola or vegetable) or an animal fat (e.g., melted lard) to delay molding or drying.
Protect the hams by placing a barrier between the meat and the insects. Heavy brown grocery bags with no rips or tears are ideal for this purpose. Hams may also be wrapped in plain butcher paper (do not use waxed butcher or freezer paper).
As shown in figures 7a-c, wrap the ham in the paper. Then, place the wrapped ham in a mesh bag, fold, and tie as shown. The hams wrapped by this method can be hung in a dry, cool, protected room to age. This room should be clean and well-ventilated.


How to Cook and Serve Virginia-Style Ham
Your ham can be prepared in a variety of ways and served with endless combinations of foods that complement ham.
The traditional four-step method is:
- Wash ham with a stiff-bristle brush, removing as much of the salt as possible.
- Place the ham in a large container, cover with cold water, and allow it to stand 10 to 12 hours or overnight.
- Lift the ham from the water and place it in a deep kettle, skin-side up, and cover with fresh, cold water.
- Cover the kettle and heat to a boil, then reduce the heat as soon as the water boils. Simmer 20 to 25 minutes per pound until done.
Another method of cooking is to soak and scrub the ham and place it in a covered roaster, fat-side up. Then, pour 2 inches of water into the roaster and place it in a 325° F oven. Cook approximately 20 to 25 minutes per pound. Baste frequently. Cook to an internal temperature of 145°F, with a three-minute rest, as indicated by a meat thermometer placed in the thickest part of the ham cushion.
Lift the ham from the kettle and remove the skin. Sprinkle with brown sugar and/or breadcrumbs and brown lightly in a 375° F oven or use one of the suggested glazes.
Orange glaze
Mix 1 cup brown sugar and the juice and grated rind of one orange; spread over fat surface. Bake until lightly browned in a 375° F oven. Garnish with orange slices.
Mustard glaze
Mix 1/4 cup brown sugar, 2 teaspoons prepared mustard, 2 tablespoons vinegar, and 1 tablespoon water. Spread over fat surface and bake as directed above.
Spice glaze
Use 1 cup brown sugar and 1 cup juice from spiced peaches or crab apples. Bake as directed above. Garnish with the whole pickled fruit.
Step 1:
With the ham dressed side up on a platter, make a cut perpendicular to the bone, about 6 inches in from the end of the hock.

Step 2:
Cut a wedge-shaped piece from the ham to leave the cut surface at a 45-degree angle.

Step 3:
Start slicing very thin slices at a 45-degree angle, bringing the knife to the bone. Eventually, the bone structure will make it necessary for you to cut smaller slices at different angles to the bone.

Methods for Cooking Ham Slices
Baking
Place a thick slice in a covered casserole and bake in a 325° F oven. Brown sugar and cloves, fruit juice, or mustard-seasoned milk may be placed on the ham during baking. Uncover the last 15 to 20 minutes for browning.
Broiling
Score fat edges and lay on a broiler rack. Place 4 inches from the broiler and broil for the specified time, turning only once.
Frying
Trim the skin off the ham slices. Cut the outer edge of fat in several places to prevent it from curling during cooking. Place a small amount of fat in a moderately hot skillet. When it has melted, add ham slices. Cook ham slowly, turning often. Allow about 10 minutes total cooking time for thin slices. Remove ham from the pan and add a small amount of water to raise the drippings for red-eye gravy. To reduce the salty taste, fry ham with a small amount of water in the skillet.
The most delightful flavor of Virginia ham is best enjoyed in thin slices. Thus, a very sharp knife, preferably long and narrow, is needed. Then follow the steps in figures 8a-c.
How To Bone Cooked Ham
The ham is easier to slice when the bones are removed while the ham is warm.
Place the skinned ham fat-side down on three or four strips of firm, white cloth that is 3 inches wide and long enough to reach around the ham and tie. Do not tie until the bone is removed.
- Remove the flat aitchbone (pelvis) by scalping around it (figure 9a).
- Use a sharp knife, and, beginning at the hock end, cut to bone the length of the ham (figure 9b). Follow the bones with the point of the knife as you cut (figure 9c).
- Loosen meat from bones. Remove bones.
- Tie the cloth strips together, pulling the ham together as you tie (figure 9d).
- Chill in the refrigerator overnight. Slice very thin or have the ham sliced by machine.


Recipes Using Virginia-Style Ham
Slice Virginia ham for tasty sandwiches. Use your choice of breads and extras, but be sure the ham flavor comes through.
Serve ham biscuits for a special treat. Use thinly sliced ham in a crusty biscuit — large biscuits for family meals, dainty ones for a tea table.
Grind cooked ham to make a ham salad filling. Flavor with finely chopped celery, onion, and/or pickle; moisten with mayonnaise or salad dressing.
Add scraps of cooked ham to scrambled eggs for added flavor. Use the bone and meat adhering to it to flavor a pot of beans or split pea soup.
Ham Loaf or Croquettes
- 2 eggs
- 2-3 cups ground, cooked ham
- 1½ cups breadcrumbs (reserve ½ cup)
- 1 tablespoon grated or finely chopped onion
- 1 cup milk
Wash your hands. Beat eggs slightly. Add other ingredients, reserving ½ cup of breadcrumbs. Pack into a baking pan and sprinkle with remaining breadcrumbs. Bake in a 350° F oven for 45 minutes.
Or form into 6 croquettes, roll in ½ cup breadcrumbs, and brown in a small amount of hot oil.
Creamed Ham Deluxe
1 tablespoon ham fat, butter, or margarine
1 tablespoon chopped onion
2 cups ground, cooked ham
(meat from hock may be used)
4 tablespoons flour
2½ cups milk
Wash your hands. Place fat in a heavy frying pan, add onion, and cook until onion is tender but not brown. Add ham, stir, and heat. Add flour, stir, and cook about 1 minute. Add milk, ½ cup at a time, stirring constantly. Cook until the mixture thickens. Serve over waffles, hot biscuits, corn sticks, or toast.
Acknowledgements
Earlier versions of this publication were co-authored by P. Graham, N. Marriott, and R. Kelly, and reviewed by Phil Blevins, with assistance from Mark Tolbert and Josh Pittman. We want to acknowledge Byron Chaves for reviewing this version of the publication.
References
Burnaby, Andrew. 1775. Travels Through the Middle Settlements in North America, in the Years 1759 and 1760: With Observations Upon the State of the Colonies. London: T. Payne.
Force, Peter, comp. 1844. Letter From John Clayton, Rector of Crofton at Wakefield in Yorkshire to the Royal Society, May 12, 1688. In Tracts and Other Papers Relating Principally to the Origin, Settlement, and Progress of the Colonies in North America from the Discovery of the Country to the Year 1776. Vol. III: Virginia. Washington, D.C.: W. Q. Force.
Additional Resources
Alexander, M., and Stringer, W. 2023. Country Curing Hams. University of Missouri Extension. https://extension.missouri.edu/publications/g2526
Christian, J. 1982. Curing and Aging Country Hams. American Meat Science Association. https://meatscience.org/docs/default-source/publications-resources/rmc/1982/curing-and-aging-country-hams.pdf?sfvrsn=2
Food Safety and Inspection Service. 2025. Hams and Food Safety. United States Department of Agriculture. https://www.fsis.usda.gov/food-safety/safe-food-handling-and-preparation/meat-catfish/hams-and-food-safety.
Mohan, A., and Sevcech, S. 2020. Country Cured Ham. University of Georgia Extension. https://secure.caes.uga.edu/extension/publications/files/pdf/B%201526_1.PDF.
Ray, F. n.d. Meat Curing. Oklahoma Cooperative Extension Service. https://pods.okstate.edu/fact-sheets/ANSI-3994pod.pdf.
Rentfrow, G., and Suman, S. 2014. How to Make a Country Ham. University of Kentucky Cooperative Extension Service. https://publications.ca.uky.edu/files/ASC213.pdf.
Virginia Cooperative Extension materials are available for public use, reprint, or citation without further permission, provided the use includes credit to the author and to Virginia Cooperative Extension, Virginia Tech, and Virginia State University.
Virginia Cooperative Extension is a partnership of Virginia Tech, Virginia State University, the U.S. Department of Agriculture (USDA), and local governments, and is an equal opportunity employer. For the full non-discrimination statement, please visit ext.vt.edu/accessibility.
Publication Date
July 30, 2026
